
12 Eyebrow Hacks Every Makeup Lover Should Know
Eyebrows have evolved from a neglected afterthought to a central feature of today’s modern beauty routines. Whether subtly shaping your face or making a bold fashion statement, expertly groomed brows highlight your eyes, balance your features, and amplify your natural beauty.
And yet. Despite this elevated status, eyebrows remain the makeup element that produces the most universal frustration. The person who has mastered a full glam eye look will describe their brows as their problem area. The minimalist who does a five-minute face will identify their brows as the thing they most wish they could fix. The seasoned makeup lover who has every product in a professional kit will still admit that brows feel somehow less controllable, less predictable, and less understood than every other part of the face.
The frustration is specific and consistent: sparse patches that product cannot convincingly fill. One brow that is definitively higher than the other. The product that migrates by lunchtime. The arch that looks natural on one side and drawn on the other. The tail that disappears or the front that looks too harsh. And the profound sensation of standing in front of the bathroom mirror, having spent twenty minutes on both brows, and feeling with certainty that something is still wrong without being able to name what.
Strong, well-shaped brows help frame the face. They are not optional beauty decoration. They are the architectural framework within which every other facial feature reads — and when the architecture is off, every other feature reads slightly less well as a result.
These twelve hacks solve the specific, recurring problems that makeup lovers experience with eyebrows. Some of them are techniques from professional makeup artists. Some are the kind of problem-solving knowledge that takes years of trial and error to discover independently. All of them are immediately applicable to the brow routine you already have, and every single one of them produces a result that is visibly better than the result without it.
Hack 1: The Three-Point Mapping Method — Find Your Perfect Shape Before You Fill
The most common brow mistake happens before any product is applied: filling and defining the brow in a shape that is slightly wrong for the face — the arch in the wrong position, the tail extending too far or ending too short, the inner corner starting at the wrong point. Every product application built on a misaligned shape compounds the error rather than resolving it.
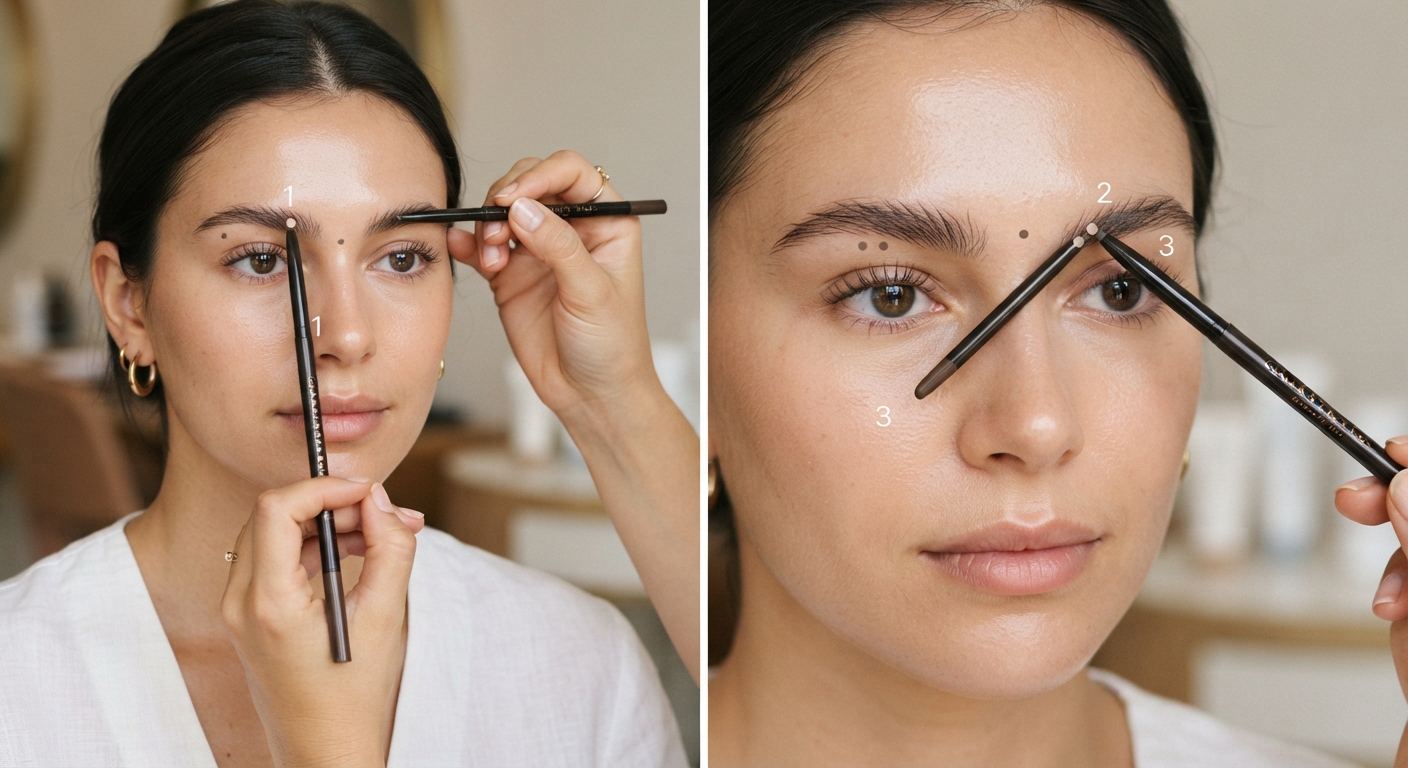
The three-point mapping method is the professional technique that identifies the three critical positions of any brow — the start, the arch, and the end — before any filling begins.
The three mapping positions:
The Start (inner corner): Hold a straight pencil vertically at the outer edge of the nostril. The point where the pencil crosses the brow is where the inner edge of the brow should begin. Hairs that grow significantly inside this line make the brows appear too close together. Hairs that start outside this line create a gap between the brow and the nose that is proportionally off.
The Arch (highest point): From the same starting position at the outer nostril edge, angle the straight pencil across the outer edge of the iris (the colored part of the eye) while looking straight forward. The point where this angled line crosses the brow is where the arch peak should sit. This position shifts slightly based on face shape — for a round face, a higher arch creates elongation; for a long face, a lower arch adds width — but the iris-alignment method provides the universally correct starting point.
The End (tail): From the same nostril position, angle the pencil from the nostril to the outer corner of the eye. The point where this line meets the brow level is where the tail of the brow should end. Brow tails that extend significantly past this point create a drooping effect. Tails that end before this point create an incomplete, abbreviated brow that shortens the eye.
How to use this during makeup: Mark these three points with a light brow pencil dot before filling. These dots become your reference points — the shape you fill within and extend toward. Check in the mirror with both eyes open to confirm the symmetry of the three points across both brows before beginning to fill.
Hack 2: Leave the Front Lighter and Fill From the Arch Back — The Natural Brow Secret
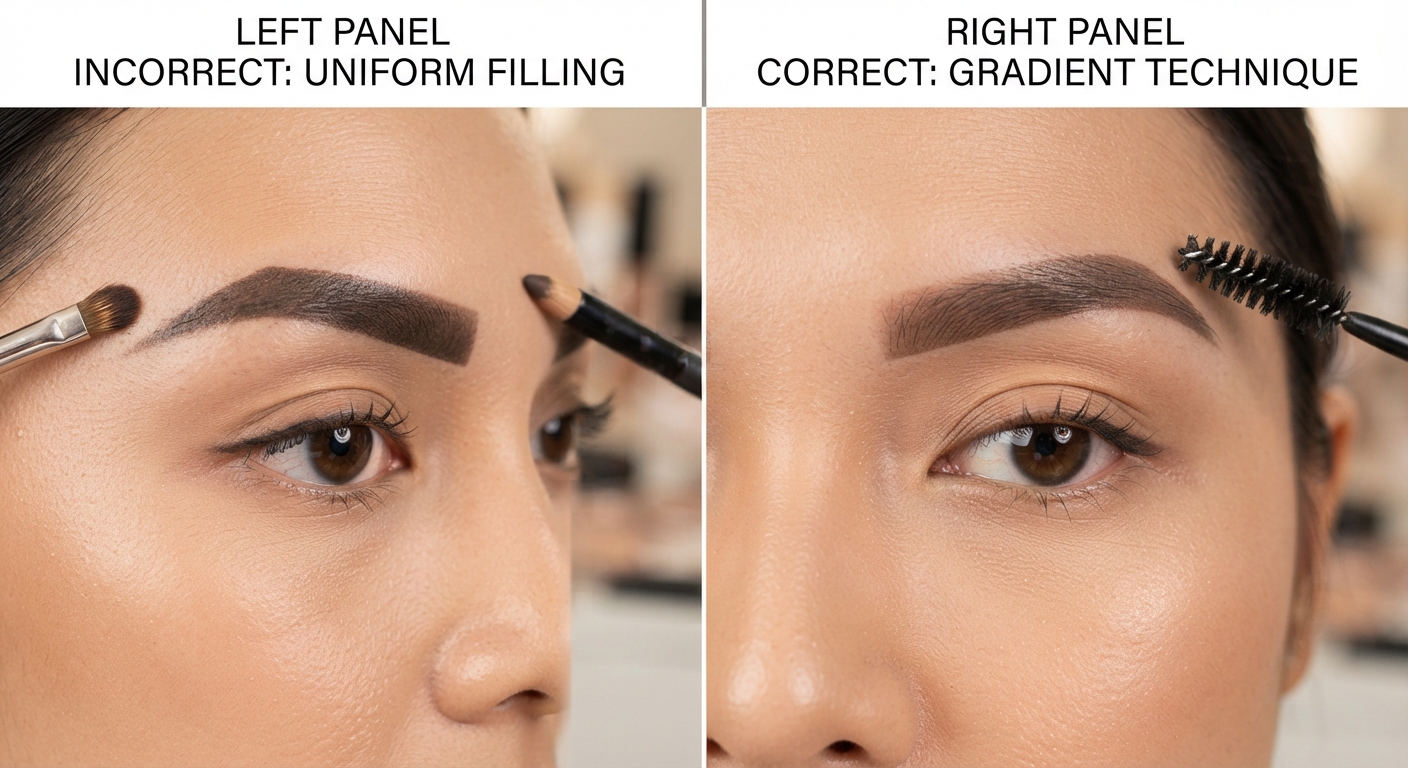
The most universally shared mistake in brow filling is beginning to fill at the inner corner and working outward with uniform product density throughout the entire brow. This technique produces brows that look drawn-on rather than grown — the front third of the brow, where natural hairs are typically finer, softest, and most irregularly spaced, is the section that requires the most delicate treatment and receives, in this common approach, the most heavy-handed product.
Fill in brows, but leave the front of the brow bare. Without any more product, brush upward, filling in the front of the brow and diffusing the lines.
The professional approach:
Begin filling at the arch — the middle-to-back section of the brow — using the product appropriate for your desired density (pencil for a natural look, pomade for a fuller, more defined result). Work from the arch toward the tail with your regular density.
Move backward toward the front third of the brow, but deliberately reduce product pressure and use the residual product on the brush or pencil rather than reloading. The front third should receive noticeably less product than the arch and tail.
Take the spoolie and brush upward through the entire brow — from the front, where the sparse application will be diffused into a soft, natural-looking front edge, through the arch and tail. The spoolie blends the lighter front section with the denser back section, producing a gradient that mirrors exactly what a natural brow looks like: softer and lighter at the inner corner, more defined and darker at the arch and tail.
The principle this creates: Natural brows are not uniformly dense. They are always softer, finer, and lighter at the inner corner and denser, coarser, and darker toward the arch and tail. A filled brow that replicates this natural gradient will always read as more believably natural than one that has been uniformly filled throughout.
Hack 3: The Concealer Frame — The Professional’s Secret for Defined Edges
Apply a thin line of concealer slightly lighter than your skin tone underneath the brow, then blend upward. It acts like an eraser for the bottom edge and makes the brow look sharp and defined.
The concealer frame is the technique that separates a competently filled brow from a professionally finished one. A filled brow without the concealer frame has product sitting within the brow’s natural boundary. The concealer frame creates a clean, precise lower edge that makes the brow appear to exist in a defined space — the difference between a brow that has been filled and a brow that has been shaped.
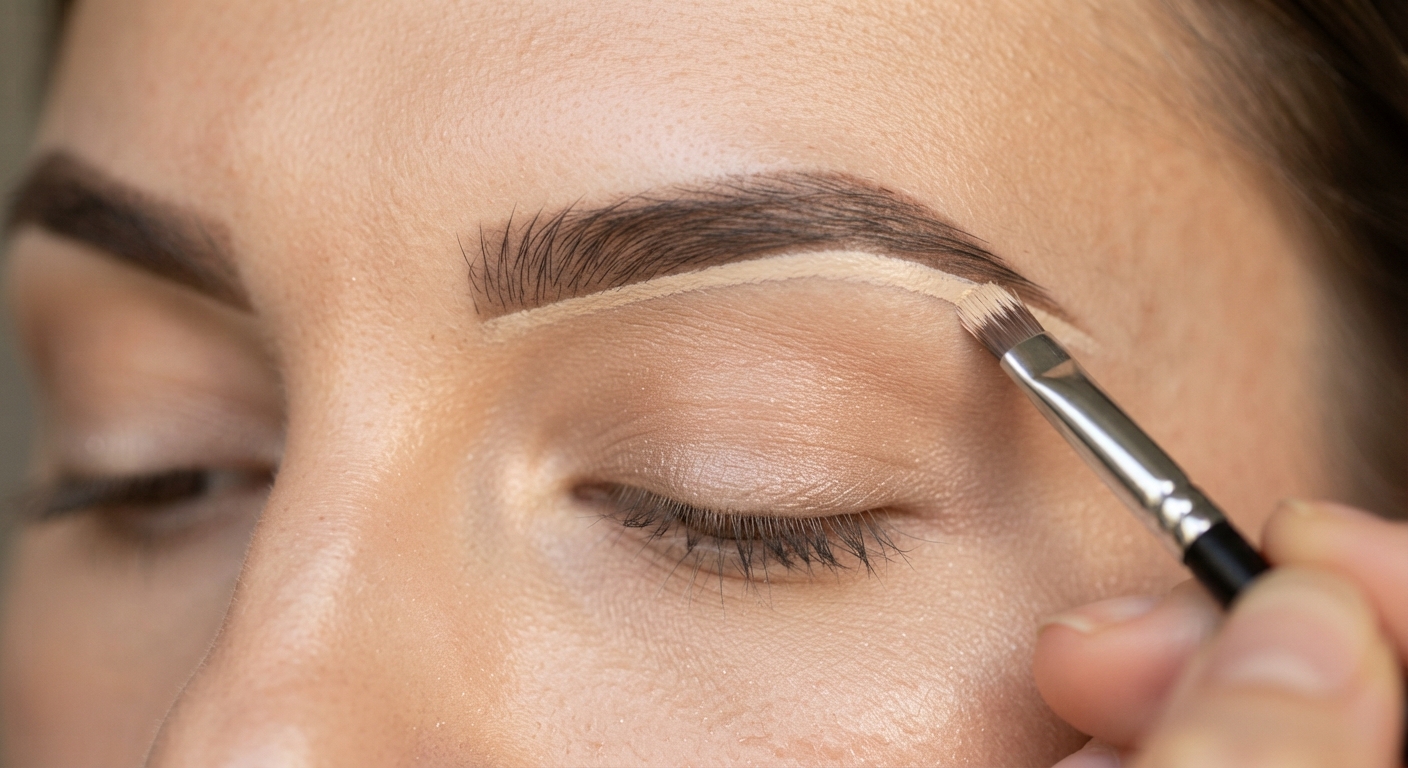
The technique:
After filling and spoolie-blending the brow, select a concealer in a shade one to two shades lighter than your skin tone. Apply a thin line of concealer directly beneath the bottom edge of the brow — following its curve — using a small flat concealer brush or the corner of a beauty blending sponge.
Blend the concealer downward and slightly outward using a gentle pressing motion rather than a stroking motion. The pressing motion deposits product without smearing the brow product above.
The upper boundary of the concealer application creates a clean, precise line against the bottom edge of the brow, removing any stray product and sharpening the shape. The blended lower edge creates the skin-clean appearance beneath the brow that frames the brow above it.
The additional benefit: The lighter concealer beneath the brow is the same technique used by professional makeup artists to create a subtle brow bone highlight without applying a separate highlight product. It simultaneously cleans the brow’s lower edge and lifts the brow bone with a slight brightening effect.
Setting the concealer: Tap a tiny amount of translucent setting powder over the concealer after blending to prevent it from transferring onto the brow area above.
Hack 4: Shade Selection — Why One Shade Lighter or Darker Changes Everything
Generally, try to match eyebrow product to your eyebrow color, but for a more natural look you can go one to two shades lighter if you have dark hair, and one or two shades darker if you’re fairer.
Shade selection is the hack that most people get wrong silently — the brow product that is slightly the wrong shade produces brows that look artificial without the observer being able to immediately identify why. A shade that is too dark produces brows that appear heavy, harsh, and drawn-on even when the technique is excellent. A shade that is too light produces brows that appear faded and incomplete, the product barely registering against the hair.
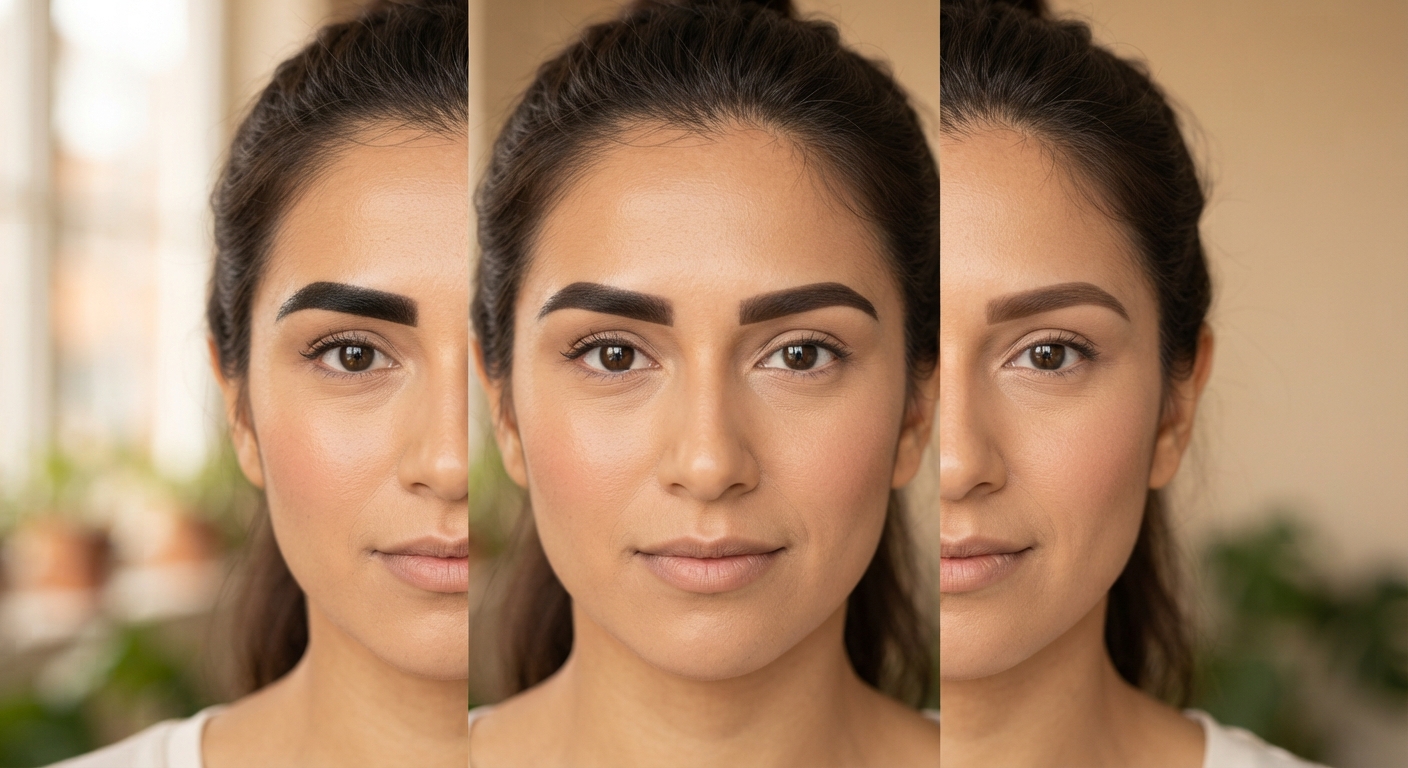
The professional formula:
For dark brunettes and black hair: Go one shade lighter than the natural hair color. The density of dark pigment on brow hairs means that matching the exact natural color produces a result that reads darker than the hair, because the product fills the spaces between hairs with the same dark pigment that the hairs themselves carry. Going one shade lighter produces a result that matches the overall impression of the natural brow more accurately than the exact match does.
For light brunettes and medium hair: Match the shade as closely as possible, or go one shade darker at the tail for additional definition.
For blondes and very light hair: Go one to two shades darker than the natural hair color. The very light natural brow hair is insufficient to provide definition when filled with a matching light shade. The slightly darker shade provides the defining contrast that makes the brow shape visible and readable.
For grey or white brows: A taupe shade — neither warm nor cool but neutral and slightly darker than the hair — creates definition without the harsh contrast of darker shades.
The undertone consideration: Brow products are available in warm and cool undertones within each shade category. Cool-undertone brow products work best for ash brown and cool-toned black hair. Warm-undertone products work best for warm brunettes, redheads, and golden blondes. A cool brow product on warm hair or vice versa creates the specific “off” quality that shade-selection mistakes produce at their most subtle.
Hack 5: The Hair-Stroke Technique — Fill With Lines, Not With Color
Use short strokes that mimic your natural hairs. Avoid drawing in long strokes, unless you have really thick brows. It’s best to do short strokes that mimic natural hairs.
The hair-stroke technique is the single most significant difference between amateur brow filling and professional brow filling. Amateur filling typically applies product in a sweeping motion across the brow — filling in the color between hairs the way a child colors between lines. Professional filling applies product in short, individual strokes that mimic individual hairs — adding to what is there rather than coloring over it.
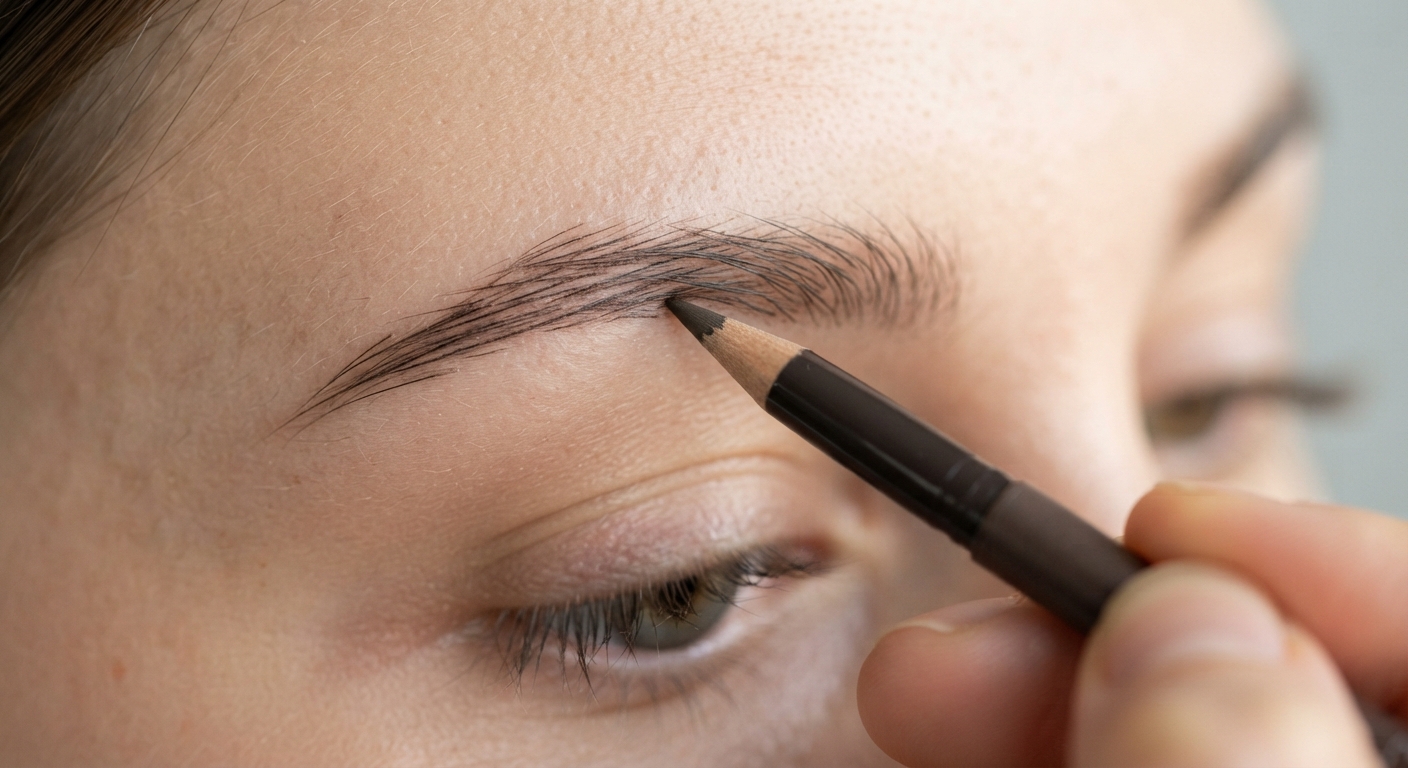
The technique in practice:
Hold the brow pencil with a very light grip — lighter than you think is necessary. The pressure determines the line weight, and hair-mimicking strokes require a very light touch to produce lines that read as the width of a natural brow hair rather than the width of a pencil mark.
Draw individual short strokes in the direction of natural hair growth — upward through the front third of the brow, slightly upward and outward through the arch, and outward and slightly downward through the tail. Each stroke should be approximately the length of a natural brow hair: three to five millimeters.
In sparse areas where natural hairs are absent, draw multiple strokes in the same upward direction to create the appearance of a group of hairs rather than a filled-in blank.
The spacing principle: Leave small spaces between hair strokes — do not fill every gap between strokes with additional product. Natural brows are not uniformly dense: they have variation in spacing that creates the textured, natural appearance that makes them convincing. Hair-stroke technique with deliberate spacing produces this variation; filled-in application eliminates it.
The product that executes this best: A fine-tip brow pencil or micro brow pen with a very fine felt-tip nib. The finer the product tip, the closer to a natural hair width each stroke produces.
Hack 6: The Spoolie Is the Most Important Tool You Own — Here Is How to Actually Use It
The spoolie brush — the mascara-wand shaped brush with soft spiral bristles — is the most underused and most important tool in the brow routine. It is not a grooming tool. It is a blending and shaping tool, and its correct use determines whether the product applied with every other tool looks natural or artificial.
Start by brushing your eyebrow hairs upward using the spoolie end of the brush. This helps to reveal the natural shape of your brows and allows you to see any sparse areas that need filling.
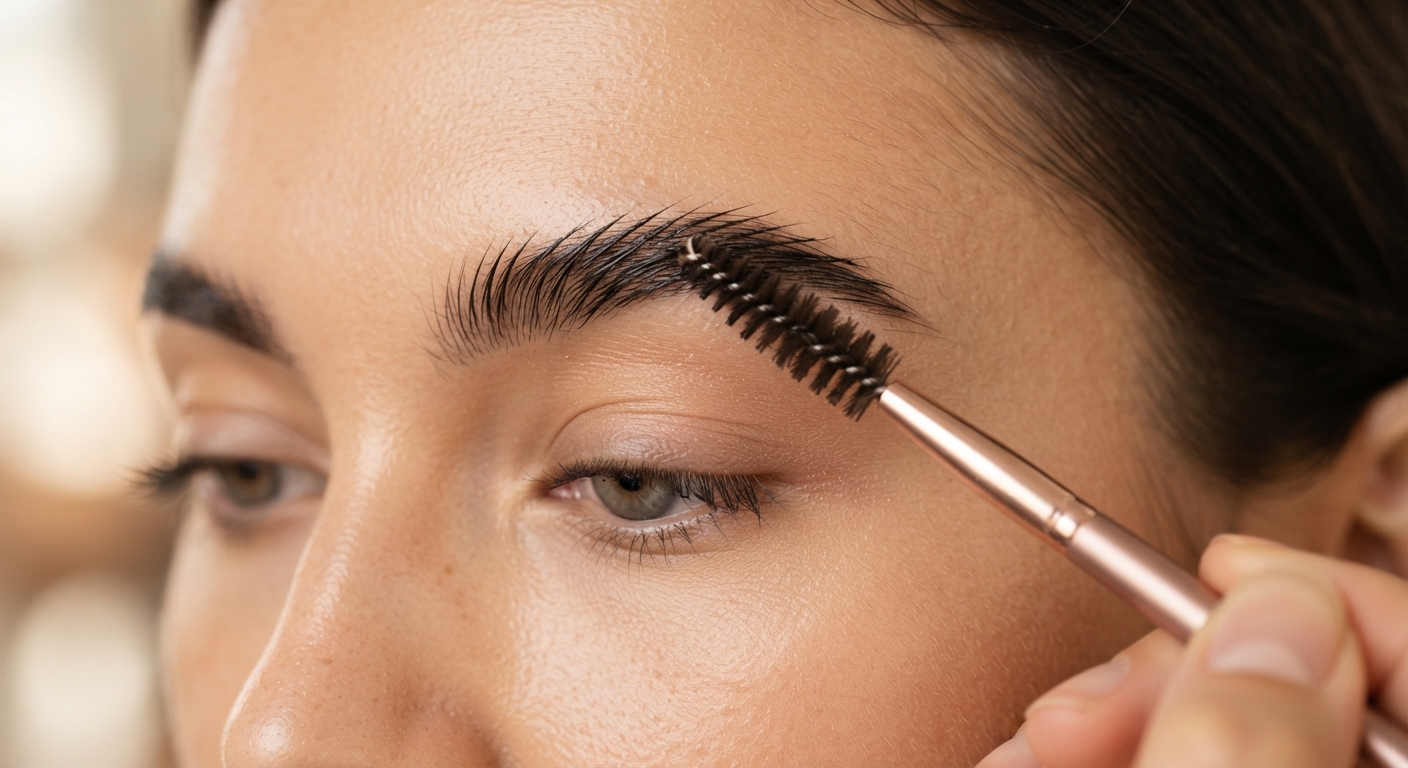
The five uses of the spoolie:
Before filling — upward brushing: Brush all brow hairs upward before applying any product. This reveals the natural shape, identifies sparse areas that need attention, and creates the “fluffy brow” texture at the front of the brow that is currently the most requested brow aesthetic. Many people discover, after brushing upward, that their natural brows require less filling than they assumed.
During filling — direction maintenance: Run the spoolie through the brow between product applications to blend and orient hair strokes. This prevents the product from sitting visibly on top of the hairs and ensures each application integrates with what is already there.
After filling — the most critical use: A pass of the clean (unloaded) spoolie through the filled brow after completing the filling diffuses any over-application, softens harsh lines, removes excess product from the brow surface, and blends the lighter front section with the denser back section into a seamless gradient. A filled brow without this final spoolie pass will always appear more product-heavy and more drawn-on than the same brow after this step.
For the fluffy brow look: Apply a small amount of clear or tinted brow gel to the spoolie and brush upward through the entire brow, directing hairs upward and slightly outward. Hold the position for three seconds before releasing. The result is the brushed-up, textured, feathery brow that has dominated editorial imagery for two years.
For cleaning up the shape: A clean, dry spoolie run along the bottom edge of the brow, angled slightly downward, removes excess product from the lower edge and sharpens the brow’s outline without the precision requirement of a concealer frame.
Hack 7: Set Your Brows to Last All Day — The Step Most People Skip
I love a wonderfully creamy, not-stiff formula — and the more color you add, the denser your brows look. Apply a brow gel as you would a mascara: pump the wand and make sure there’s not too much product on it before coating hairs. Give it a few seconds to set, then reapply.
The brow gel finishing step is the most commonly skipped step in the brow routine and the step that most dramatically extends the wear of everything applied beneath it. Without a setting step, filled brows — regardless of the quality of the product or the precision of the technique — will transfer, smudge, and lose definition throughout the day as the oil and moisture of the skin work on the product from beneath.
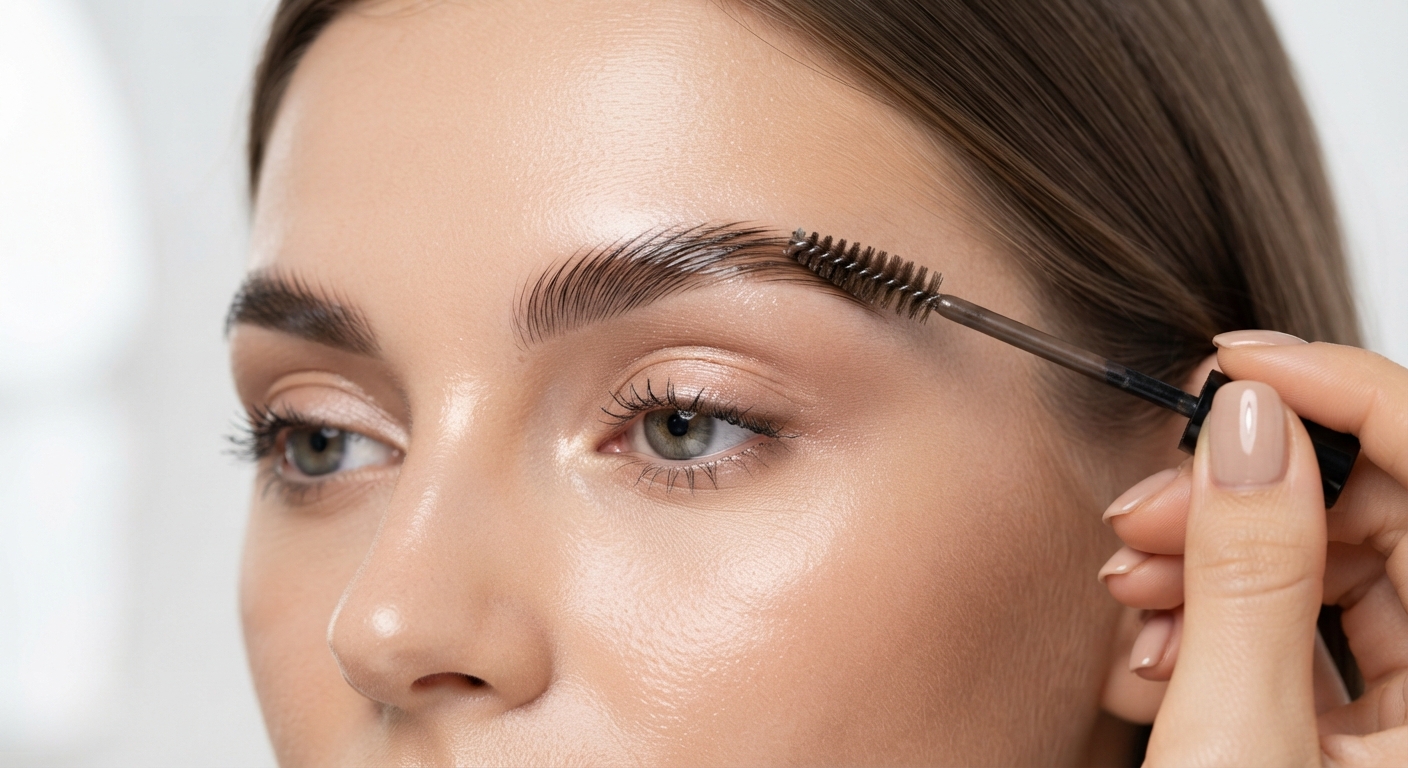
Clear vs. tinted gel — when to use each:
Clear brow gel: For brows that are naturally full and well-shaped, where the goal is hold and definition without additional color. Clear gel tames, sets, and holds without adding pigment. It is the correct choice for the “your brows but better” natural look.
Tinted brow gel: For brows that benefit from color filling in addition to hold. Tinted gel adds density and color while simultaneously setting everything in place. It is both a filling product and a setting product, making it the most efficient single-product brow option for time-limited routines.
The application technique that prevents the clumped, flaky result:
Pump the wand once into the product. Before applying to the brow, wipe both sides of the wand against the edge of the product tube opening — removing the excess that would deposit too much product in a single stroke.
Apply with the same upward direction as the spoolie pass — from the inner corner moving outward and upward. Allow the first coat to set for fifteen seconds before applying a second coat for additional hold or density.
The formula consideration: Brow gel should feel weightless on the hairs once it has set. If the gel feels stiff, flaky, or heavy, the formula is wrong for the brow or too much product has been applied. Wipe down the wand more aggressively before the next application.
Hack 8: The Map-and-Tweeze Technique — Shaping Your Brows Without Over-Plucking
Avoid trimming hairs — your hair length is responsible for up to 90% of the “impact” your brow makes, so by over-trimming, you create a hard line and “shrink” the brow. The same applies to waxing and threading, so use only tweezers and very selectively.
Over-plucking is the brow mistake that is most difficult to recover from — the stray hair that seemed logical to remove today is the hair that the brow needs next month when the shape is being re-evaluated. The professional approach to brow shaping is conservative, specific, and guided by a clear mapping before any hair is removed.
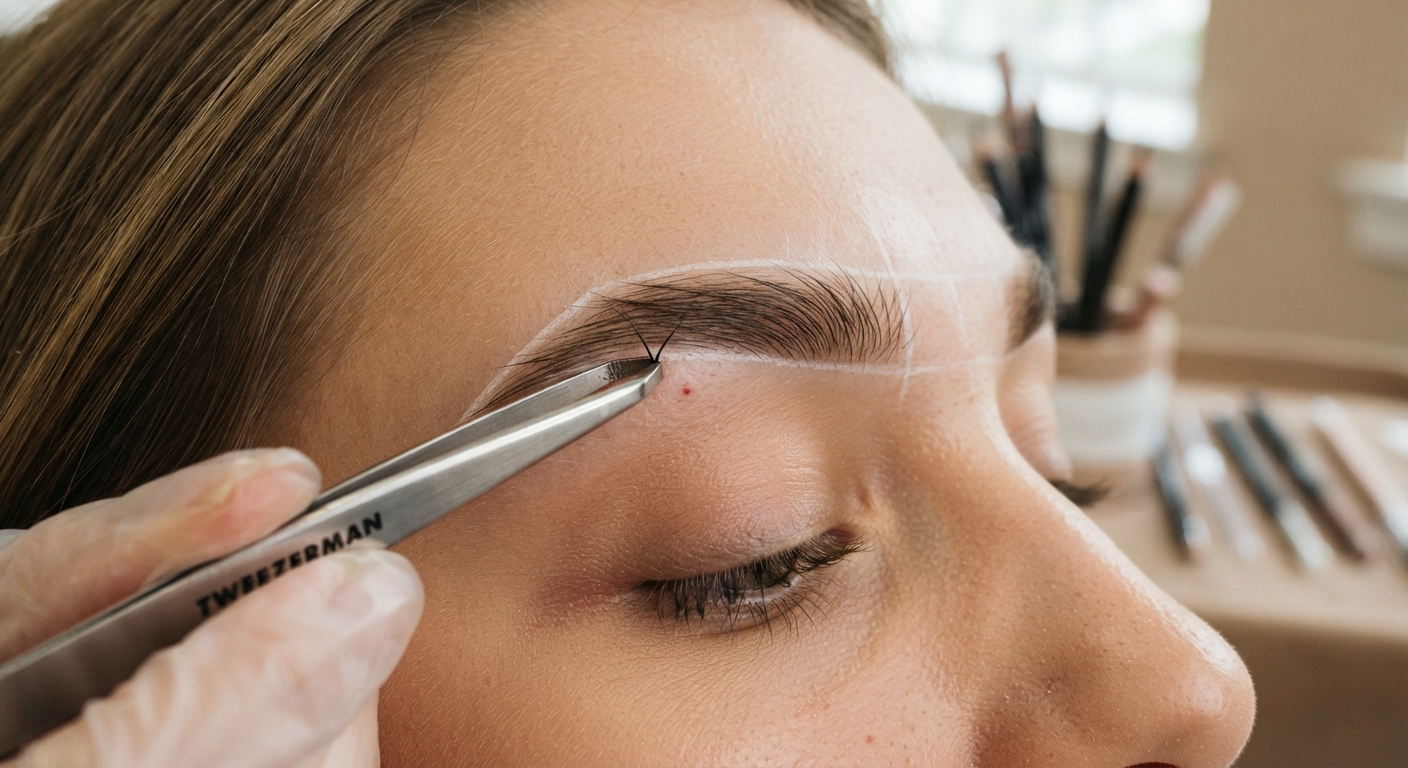
The before-you-tweeze protocol:
Apply the three-point mapping method from Hack 1. Mark the start, arch, and end positions on both brows.
Using a white or light-colored eye pencil or a thin cotton swab dipped in concealer, map the area of hairs that fall outside the desired brow boundary — the hairs below the bottom edge, the stray hairs above the top edge at the tail, and any hairs that fall inside the inner start point.
Step back and look at the mapping with both eyes. Only remove hairs that fall clearly outside the mapped boundaries. Do not remove any hair that is within the desired brow shape, even if it appears individually stray — it contributes to the brow’s density.
The recovery option for over-plucked brows:
For brows that have been over-plucked, the three-point mapping method is equally useful — it identifies the position of hairs that are no longer there and guides the filling technique toward recreating those positions with hair-stroke technique.
Sparse brows can dramatically change the appearance of your face — but the good news is there are plenty of ways to fill and shape them. According to celebrity makeup artist Margina Dennis, using a brow stencil, micro pencil or brow marker, and lightly tinted gel are among the most effective tools for achieving naturally fuller brows.
The one trimming exception: Very long brow hairs that extend significantly above the top edge of the desired brow shape may benefit from trimming. Trim only after brushing upward to reveal their full length, and remove only the portion that extends clearly beyond the desired top boundary. Trim less than you think is necessary — the hair will not grow back immediately.
Hack 9: The Soap Brow Hack — Feathery Fullness for Almost Nothing
The soap brow technique — the beauty hack that went viral in every corner of the internet for very good reason — produces the brushed-up, feathery, full-looking brow without any product purchase or professional service. A bar of clear or white glycerin soap, a clean spoolie, and water are the only requirements.
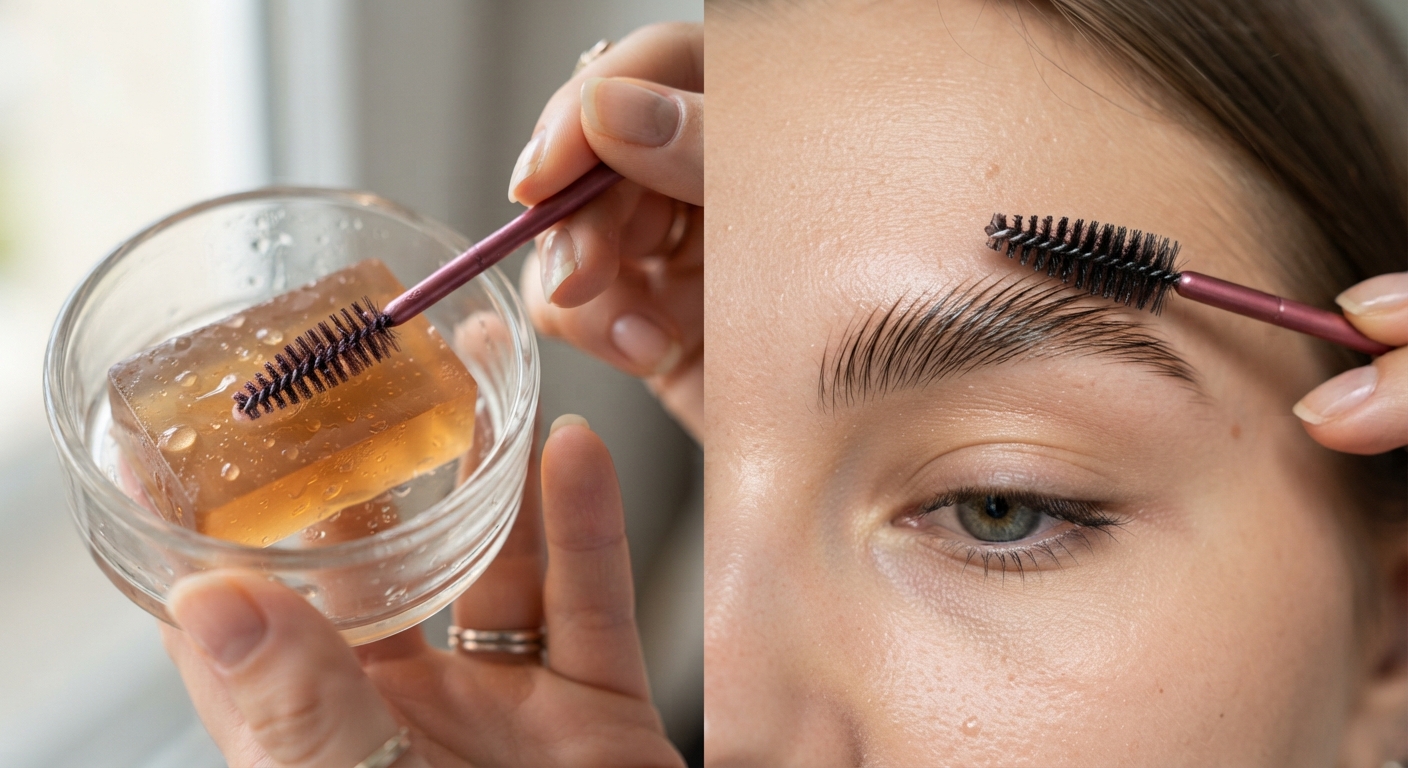
The technique:
Dampen a clean spoolie with a small amount of water — not saturated, just lightly damp. Press and drag the damp spoolie across the top surface of a glycerin soap bar, loading a small amount of the soap product onto the bristles.
Immediately apply to the brow hairs using an upward brushing motion — from the front of the brow, brushing each hair upward and holding for two to three seconds. Work through the brow from front to tail, directing all hairs upward.
Allow the soap to dry on the hairs for thirty seconds. The soap sets the hairs in their upward position with a hold that typically lasts four to six hours depending on the skin’s oiliness and the weather.
The application timing principle: The soap brow must be applied before any brow product — powder, pencil, or gel. Applied over existing product, it can disturb the filling work beneath. Applied to clean, brushed brows first, it establishes the shape that subsequent filling integrates with.
Why this works: The soap acts as a styling agent — the same principle as hair gel on scalp hair, but applied to brow hairs. It coats the individual brow hairs with a lightly adhesive film that holds their position as it dries. Clear glycerin soap is preferred because it dries to an invisible film; white opaque soaps can leave a slight residue.
The professional upgrade on this hack: Many professional brow stylists have noted that the soap brow’s viral success led to the development of dedicated “brow soap” products — solid wax-and-soap formulas in compact cases with integrated spoolies. These purpose-made products deliver the same result as the DIY soap technique with more consistent hold and fewer formulation variables.
Hack 10: The Eyebrow Window — The Test That Tells You If Your Brows Are Symmetrical
The most common brow frustration after technique and product selection is symmetry — or the perception of asymmetry. You spend equal time on both brows. You use the same product. You apply the same pressure. And you are somehow certain that one is different from the other. Sometimes this is accurate. Often, what appears as asymmetry in the close-up mirror view resolves when the face is observed at normal distance. The eyebrow window test distinguishes between these two situations.
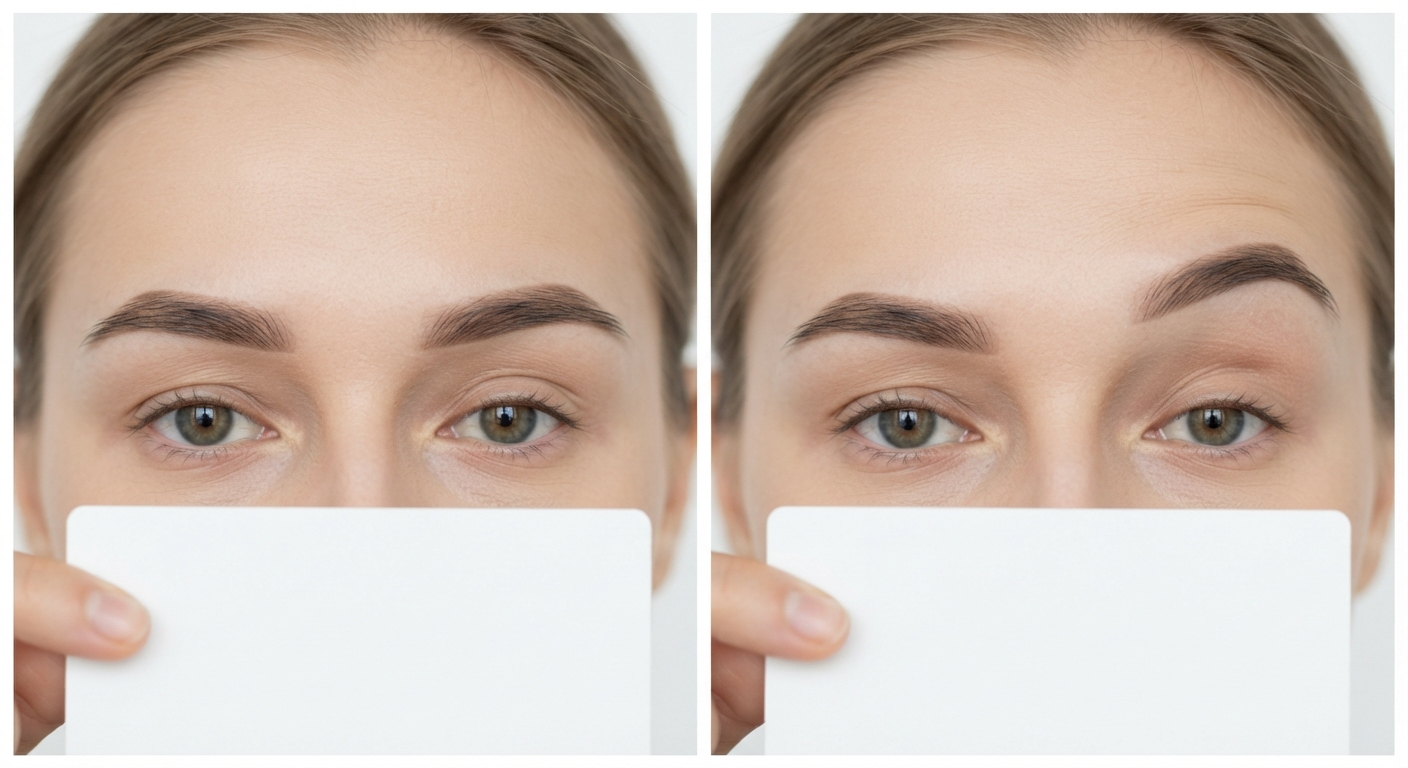
The eyebrow window test:
After completing both brows, hold a piece of paper or a book horizontally beneath both brows simultaneously — one edge running along the bottom of both brows at once. Look in the mirror with the paper held in place.
If both brow bottom edges align with the paper’s horizontal edge, the brow placement is symmetrical. If one brow’s bottom edge clearly sits above or below the paper’s edge, the placement is genuinely asymmetrical.
The correction principle: True facial asymmetry — one brow bone genuinely higher than the other — is common and cannot be corrected through product. It can be compensated for through a slightly higher arch on the lower-set brow, which optically balances the height difference. This compensation requires a subtle adjustment of the arch position using the three-point mapping method, placing the arch approximately two millimeters higher on the lower-set brow.
The thing not to do: Do not attempt to match the lower brow to the higher brow by overplucking from the top of the higher brow. This reduces the height of both brows and makes them appear more similar in height by making both appear shorter rather than by genuinely balancing them.
Hack 11: The Highlighter-Under-Brow Trick — The Lift That Takes Under 30 Seconds
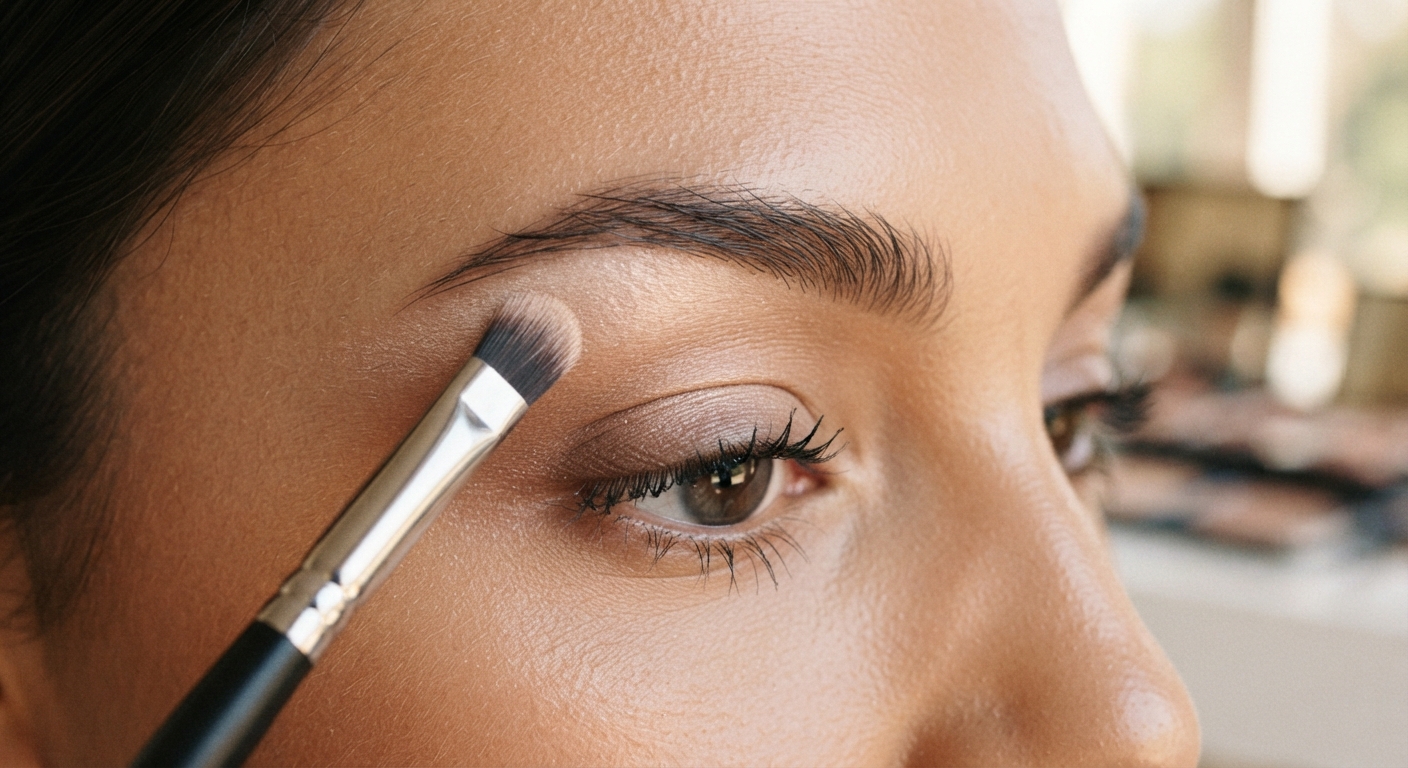
A subtle highlight under the arch of the brow is another way to create that lifted effect. Use a soft, light-reflecting highlighter shade and blend well for a natural finish. This placement subtly draws attention upward. The highlighter-under-brow technique is the most underused makeup enhancement available — and it takes under thirty seconds to apply, requires no precision, and produces a visible lifting effect on both the brow and the eye beneath it.
The technique:
After completing the brow, apply a small amount of a highlight product — a matte or subtle sheen highlighting powder, a champagne or pearl highlighter, or simply a light concealer — to the area directly beneath the highest point of the brow arch using a small blending brush or fingertip.
Blend gently in small circular or pressing motions. The highlighted area should be no wider than approximately one centimetre, centered directly beneath the arch’s highest point.
What this creates: A light-reflective area directly beneath the arch creates three distinct effects simultaneously. It brightens the brow bone, creating the impression that the brow bone is more prominent and elevated. It creates contrast between the highlighted brow bone and the eye socket below, making the eye area appear more defined. And it draws the eye upward — toward the brow — away from any darkness or hollowing in the eye socket area.
The product that performs best for this: A matte or very subtle pearl highlighter performs more naturally in daylight and in photographs than a high-glitter or chunky-particle highlight. The effect should read as the light naturally hitting a higher brow bone, not as an applied highlight.
The highlighter shade principle: The highlight beneath the brow should be at most two to three shades lighter than the surrounding skin tone. Too strong a contrast reads as a white bar beneath the brow rather than as a subtle lift.
Hack 12: The Color Match for Every Hair Situation — The Formula for Sparse, Dark, Light, and Everything Between
According to celebrity makeup artist Margina Dennis, using a brow stencil, micro pencil or brow marker, and lightly tinted gel are among the most effective tools for achieving a polished, natural look — but the tool means nothing if the product formula is not matched to the specific brow situation it is being used on.
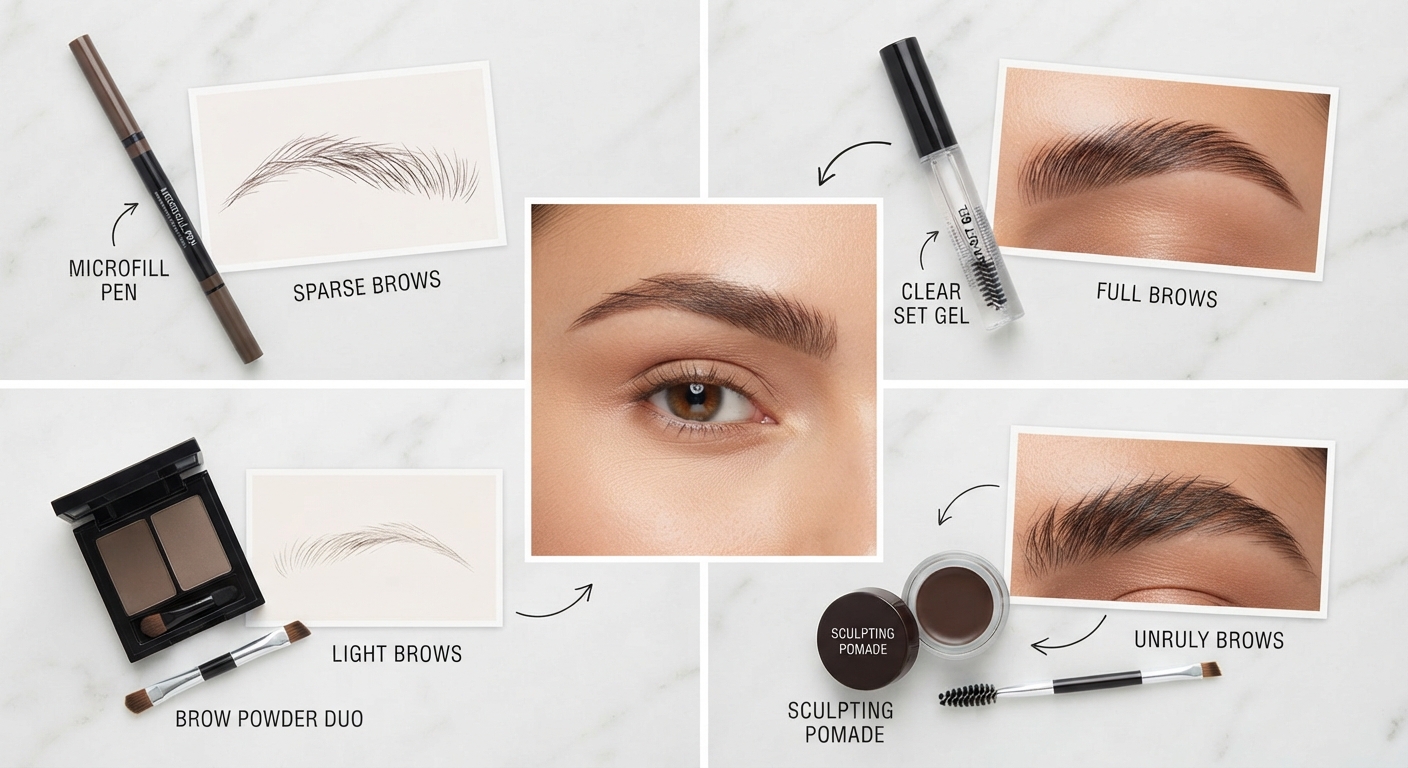
The final hack is the decision matrix that makes every other technique more effective: matching the right product formula to the specific brow situation rather than using a single product across all situations.
For sparse brows with limited natural hair:
A brow marker or micro brow pen — the felt-tip format that produces the finest possible line — is the product that creates the most convincing hair-stroke in completely sparse areas. Where a pencil can draw a convincing stroke between existing hairs, the micro pen is fine enough to create convincing individual strokes in areas where no hair exists.
Pair with a very lightly tinted brow gel to unify the drawn strokes with any existing hairs and prevent the hair-stroke application from sitting obviously on the skin.
For thick, full brows that need only definition:
A clear gel with a spoolie is the only product required. Applying more — pencil, pomade, powder — to already-full brows creates the blocked, over-filled appearance that comes from adding product density to an already-dense structure.
A tinted gel in one shade darker than the natural hair defines without filling — it deepens the color of existing hairs rather than adding color in spaces between them.
For unruly, coarse brows that resist gel:
A brow wax or wax-based pomade applied first with a stiff angled brush sets the hairs in the desired direction before any color product is applied. The wax holds the position; the color product applied over it adds the definition and density without fighting with hairs that have already been physically directed.
For light or grey brows:
Brow powder applied with an angled brush provides the softest, most natural-looking result for light brows that need definition without the risk of the harsh edges that pencil products can create. A feathering technique with powder — tapping the brush rather than sweeping it — deposits color gradually and blendably in the way that suits naturally fine, light hair most convincingly.
The universal finishing principle: Regardless of the specific product combination used, every brow routine ends the same way. A pass of the spoolie to blend and orient. The concealer frame beneath the arch. The under-brow highlight. The brow gel to set.
These finishing steps — each taking less than thirty seconds — are what convert a correctly filled brow into a professionally finished one. The difference is visible. The time investment is minimal. And the result, at the end of it, is a brow that frames the face rather than sitting independently above it — which is, after all, the entire point.
The Complete Brow Routine Using All 12 Hacks — In Order
For the reader who wants to know exactly how these twelve hacks fit together into a single, complete brow routine:
Step 1: Brush brows upward with a clean spoolie. (Hack 6)
Step 2: Apply the three-point mapping method with light dots. (Hack 1)
Step 3: Apply the soap brow technique if desired for the fluffy look, and allow to set. (Hack 9)
Step 4: Select the correct product for your specific brow situation. (Hack 12)
Step 5: Apply color product using hair-stroke technique, leaving the front lighter. (Hacks 5 and 2)
Step 6: Run the loaded spoolie through the brow to blend and orient. (Hack 6)
Step 7: Tweeze any stray hairs outside the mapped boundaries if needed. (Hack 8)
Step 8: Apply the concealer frame beneath the lower brow edge. (Hack 3)
Step 9: Apply the under-brow highlight. (Hack 11)
Step 10: Check symmetry with the eyebrow window test and adjust if needed. (Hack 10)
Step 11: Verify shade selection matches the hair color correctly. (Hack 4)
Step 12: Apply brow gel to set everything in place. (Hack 7)
Total time: Six to twelve minutes for a complete, professionally finished brow routine.
ENDING:
Eyebrows matter more than any other single facial feature in terms of the impression they create at first glance — because the first thing the eye reads when it encounters a face is the brow-eye complex, and the quality of that reading determines whether the face appears polished, healthy, and put-together or slightly off in a way that even the observer cannot always name.
Twelve hacks. The mapping method that gets the shape right before the product goes on. The front-lighter filling technique that makes product read as natural. The concealer frame that no professional skips. The shade formula that prevents the “drawn-on” result. The hair-stroke technique. The spoolie used correctly. The setting gel applied with the wand properly loaded. The conservative tweeze guided by a pre-removal map. The soap brow for the feathery texture moment. The symmetry test that distinguishes real asymmetry from mirror-distance distortion. The under-brow highlight in thirty seconds. The product-to-situation matching that makes every other technique more effective.
Each hack, applied individually, produces an improvement. Applied together in the sequence above, they produce a brow routine that will not require adjustment or overthinking for as long as you use it.
Save this to Pinterest, share it with every makeup lover you know who has described their brows as their problem area, and start with hack number two.
Leave the front lighter. It changes everything
4 thoughts on “12 Eyebrow Hacks Every Makeup Lover Should Know”