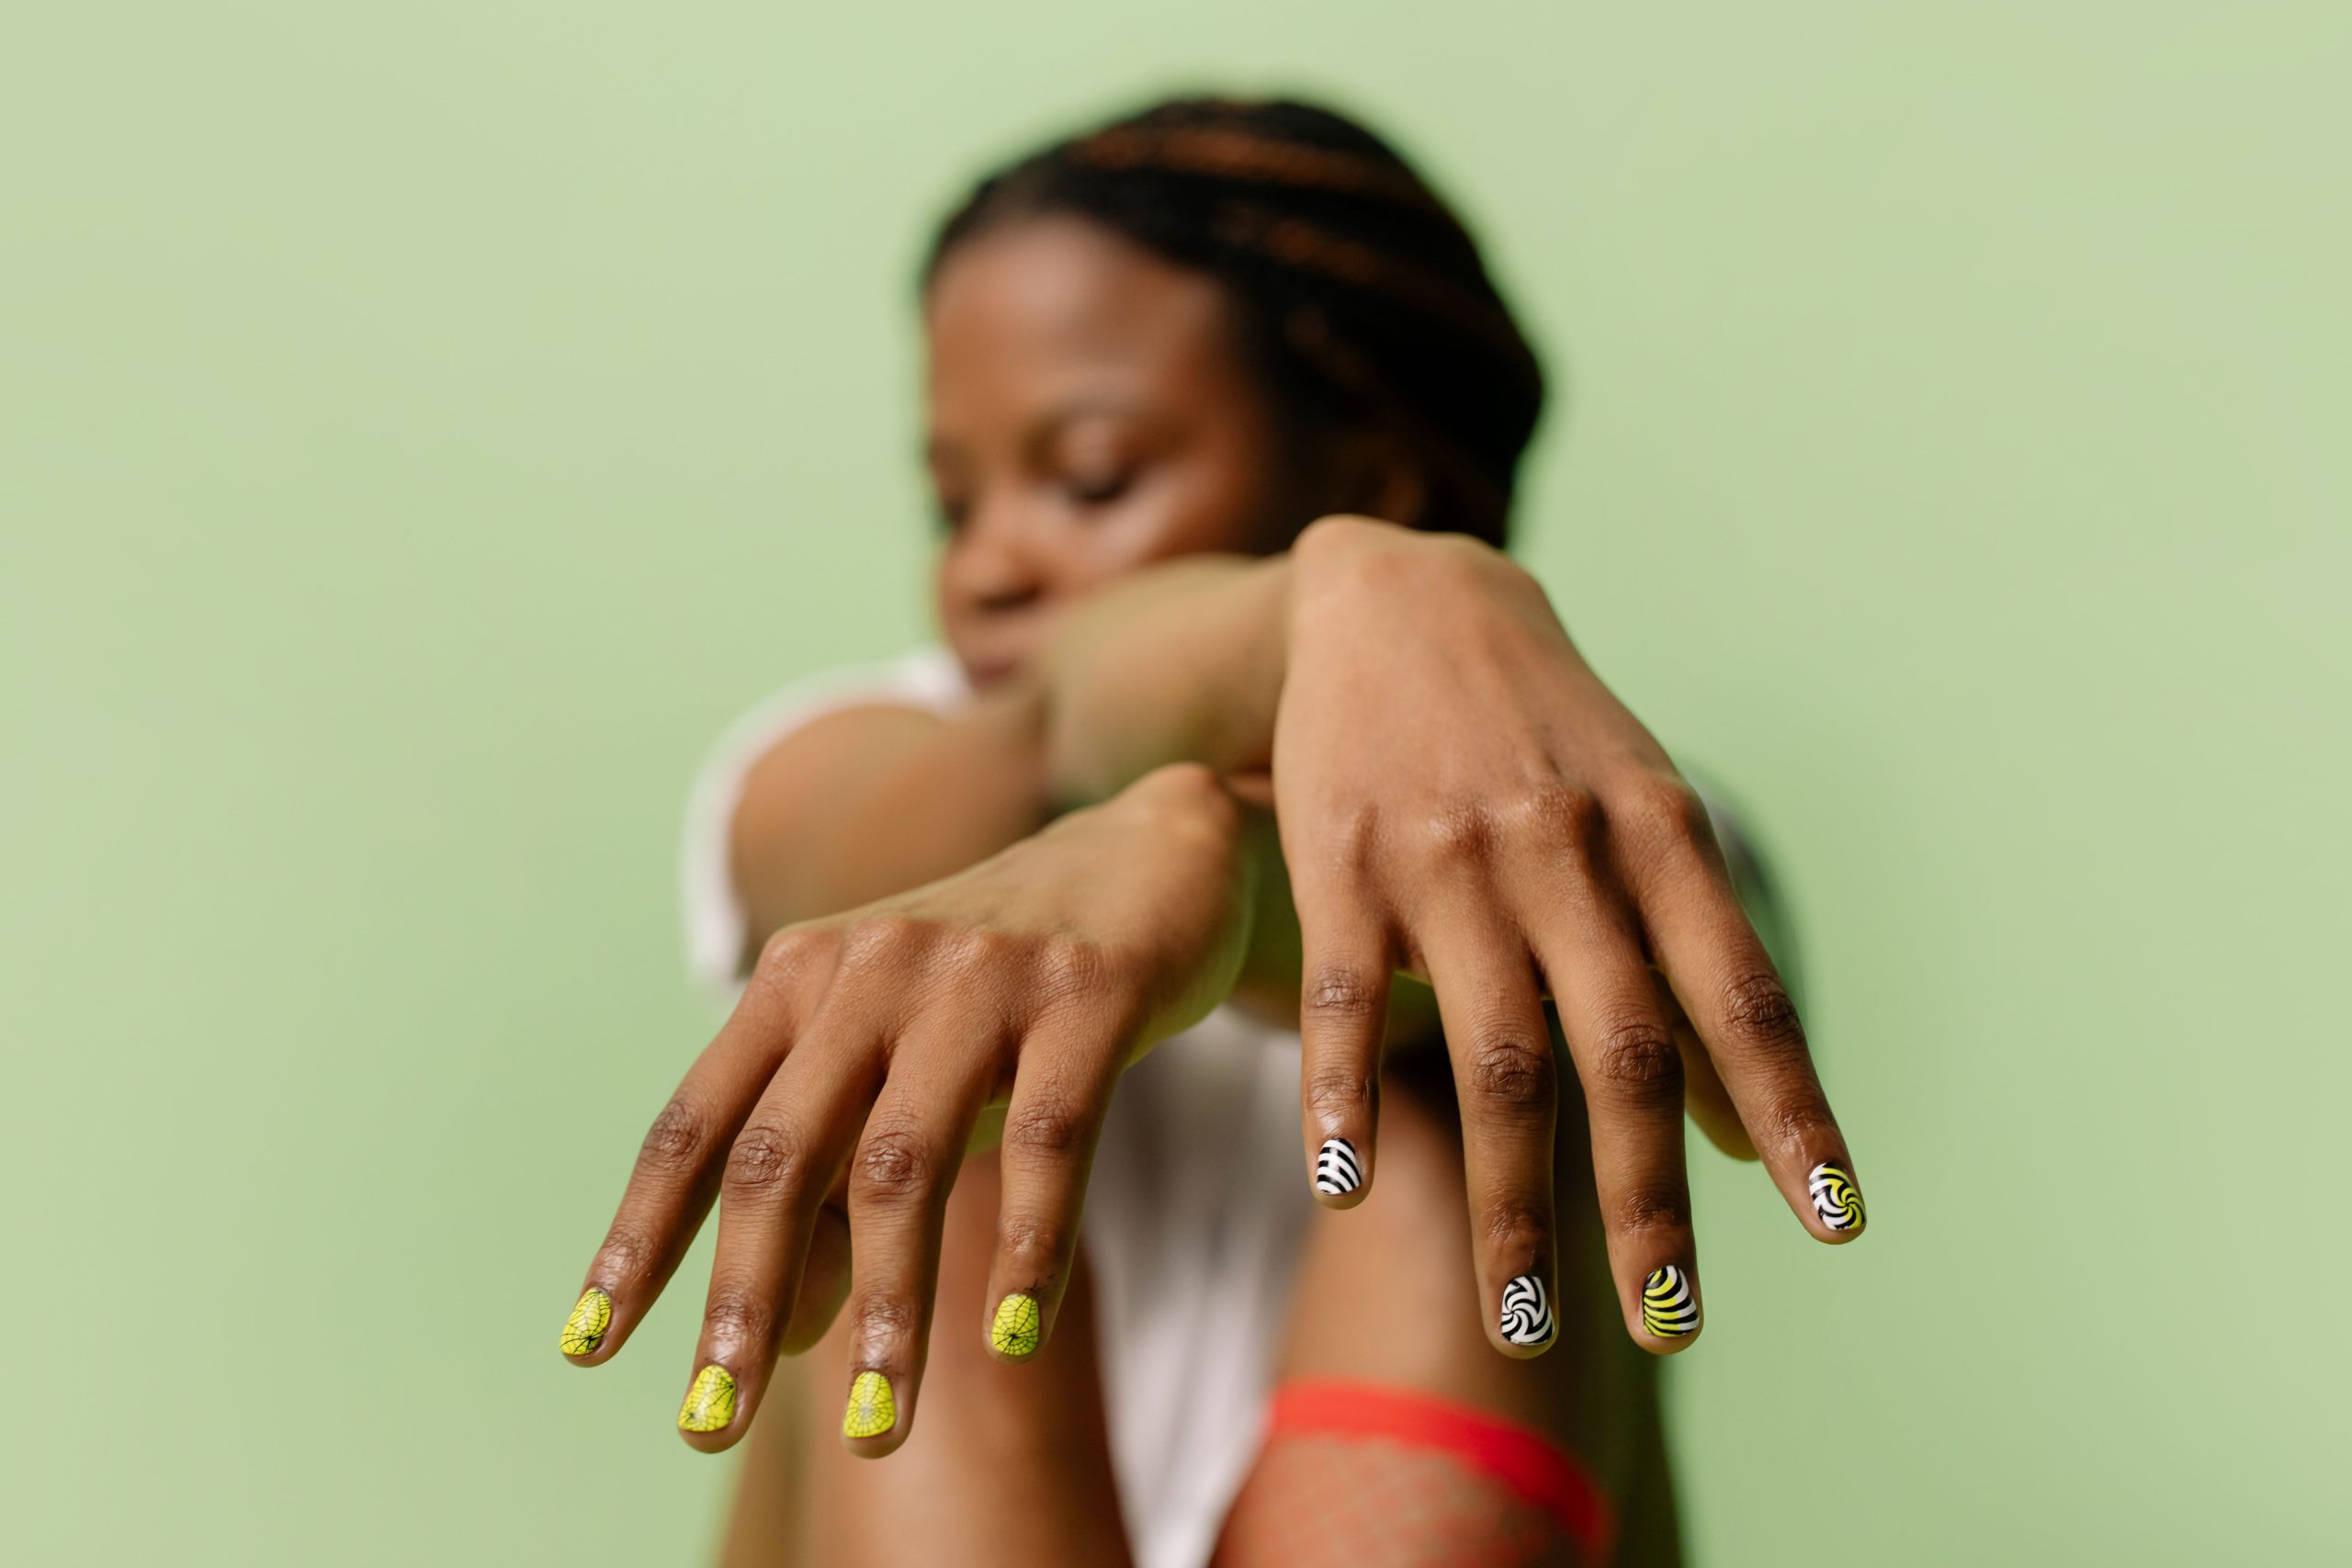
25 Halloween Nail Ideas You’ll Want to Show Your Nail Tech
Halloween nails tend to fall into two very different categories. On one side, there are fully themed manicures covered in pumpkins, ghosts, spiderwebs, blood drips, and every other October symbol imaginable. On the other, there are barely-there seasonal designs that use black polish or one small accent and quietly hint at Halloween without making the manicure feel like part of a costume.
The best Halloween manicures often sit somewhere between those two extremes.
They feel unmistakably seasonal, but they are still beautiful enough that you want to keep looking at your hands long after the novelty wears off. The design might use a tiny ghost on an otherwise sheer nude nail, a burgundy French tip shaped like dripping polish, or glossy black chrome that feels dark and dramatic without requiring a single illustrated Halloween character.
That balance matters because a manicure usually stays with you for more than one night. A design that feels exciting when you leave the salon should ideally still work with your everyday clothes, jewelry, work outfits, and whatever plans happen between your appointment and October 31.
The ideas below range from minimal and elegant to playful and unmistakably spooky. Some depend on detailed nail art, while others create their Halloween effect almost entirely through color, texture, shape, or finish. The goal is not to choose the most complicated set. It is to find the one that matches how you actually want Halloween to look on your hands.
Here are twenty-five Halloween nail ideas worth saving before your next appointment.
1. Milky Nude Nails With Tiny White Ghosts
Ghost nail art can become cartoonish very quickly, but placing tiny white ghosts over a translucent milky nude base keeps the design surprisingly soft. Instead of covering every nail with a large character, use one or two small ghosts per hand and allow the remaining nails to stay mostly bare. The negative space gives the artwork room to breathe and makes the manicure feel intentional rather than crowded.
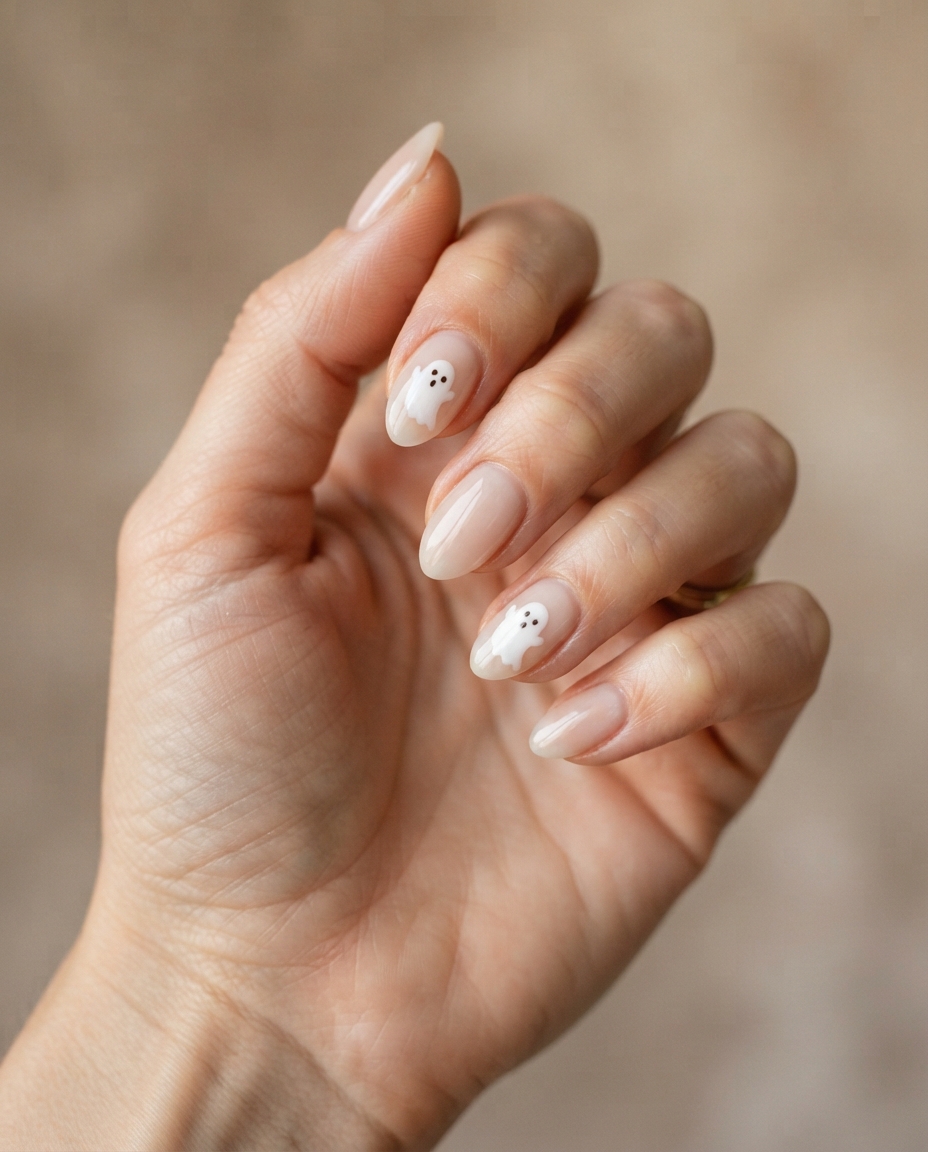
The best version uses slightly imperfect ghost shapes rather than perfectly symmetrical illustrations. A tiny curved body, two small black eyes, and perhaps one miniature mouth are enough to establish the theme. Medium-short almond or oval nails work especially well because the rounded silhouette complements the soft shapes of the ghosts and keeps the overall manicure cute rather than theatrical.
Best for: Anyone who wants recognizable Halloween nail art without committing to a dark manicure.
Nail tech note: Ask for the ghost designs to remain very small and spaced apart, with most of the nude base still visible.
2. Black Micro French Tips
A black micro French manicure is one of the easiest ways to create Halloween nails that still feel elegant enough for everyday wear. The structure is exactly what makes it work: a sheer nude or blush base keeps the nail looking natural, while an ultra-thin black edge introduces just enough darkness to change the entire mood of the manicure.
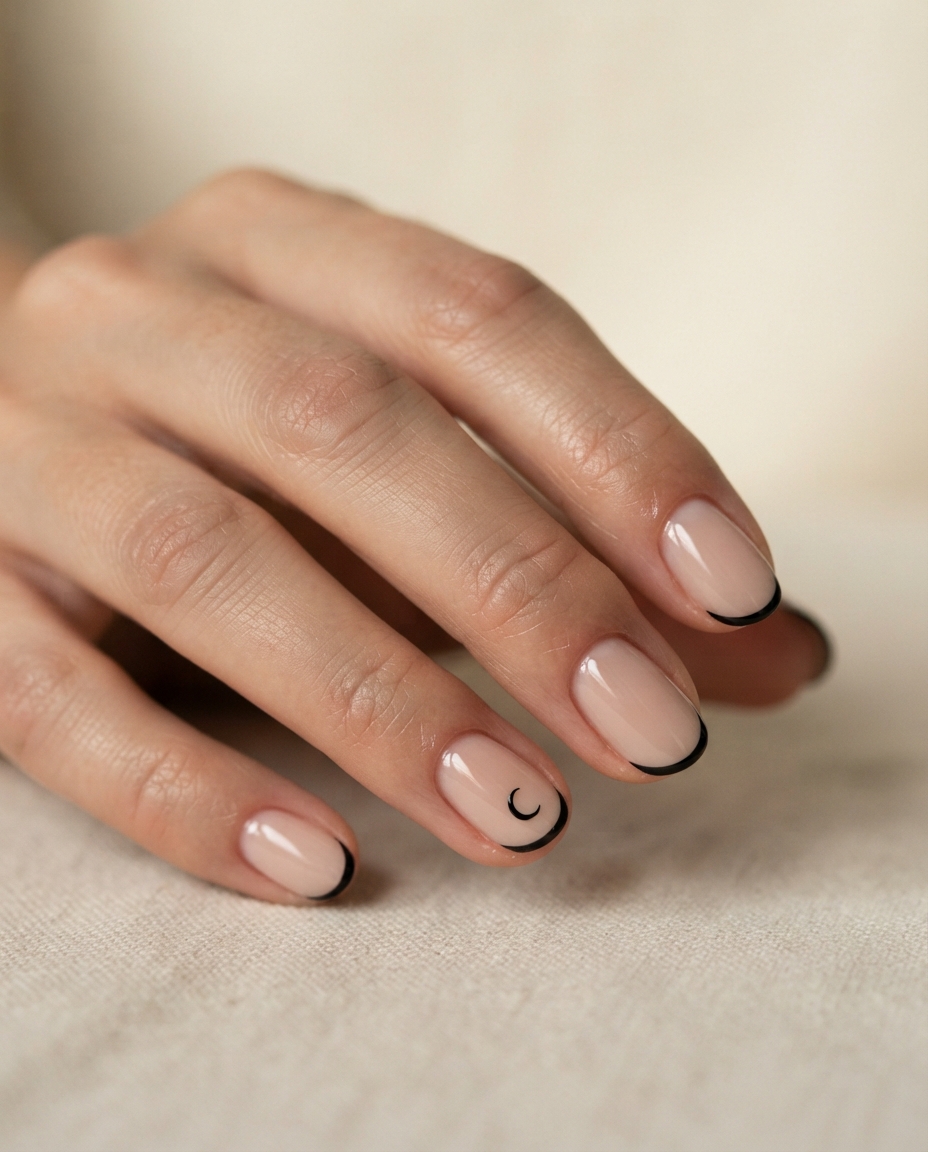
The important detail is keeping the tip genuinely narrow. A thick black French tip becomes much more graphic and dramatic, while a micro tip behaves almost like a fine outline around the nail. Almond nails make the look softer and more feminine, whereas short square nails give it a cleaner, sharper finish.
If you want to make the manicure slightly more seasonal without losing its simplicity, one accent nail can include a tiny black star, crescent moon, or miniature spider placed near the cuticle.
Best for: Minimalists who want Halloween nails without obvious Halloween characters.
3. Glossy Black Almond Nails
Sometimes the strongest Halloween manicure does not need any nail art at all. Glossy black nails create a dramatic seasonal look through color alone, which makes them one of the easiest choices to wear beyond Halloween itself. The dark polish works particularly well on almond nails because the tapered shape gives the manicure elegance and prevents the black from feeling too heavy.
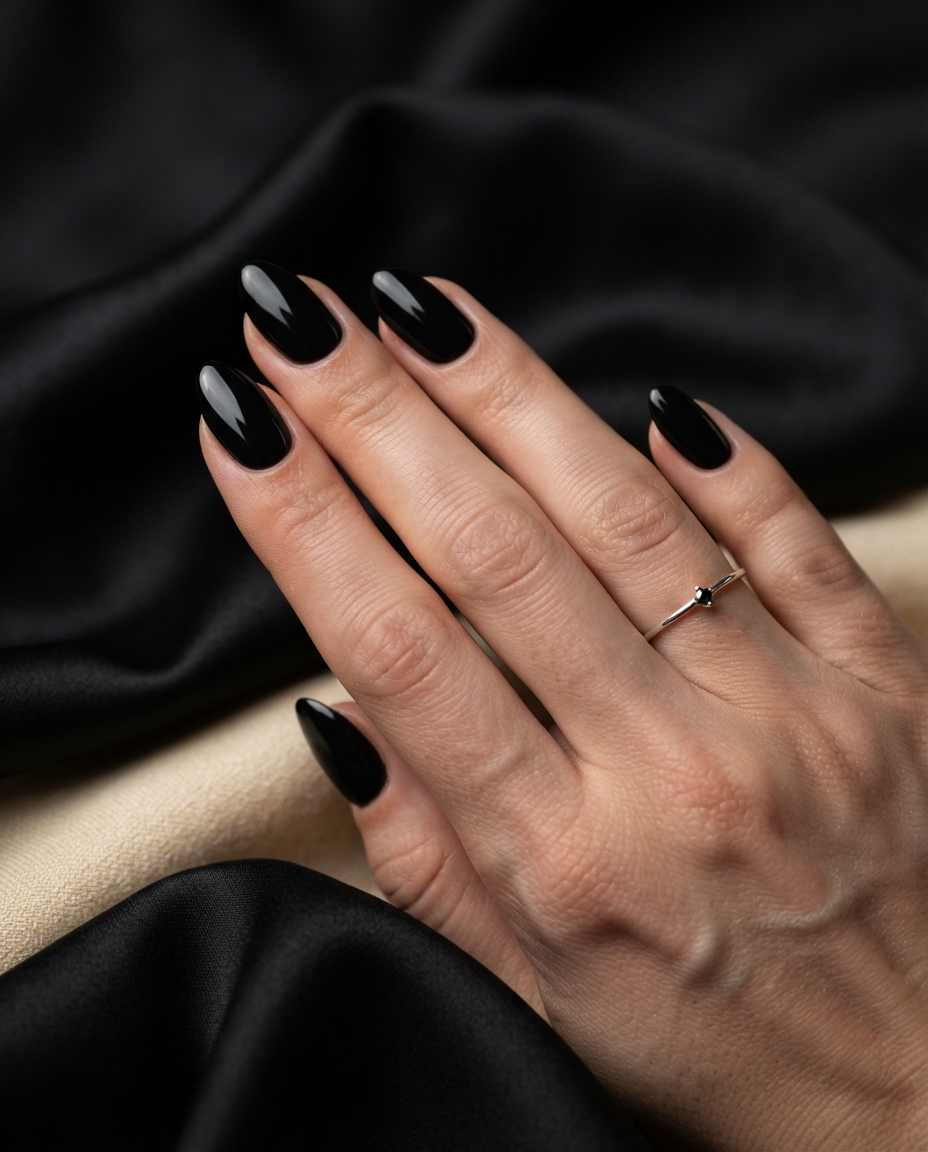
The difference between a polished black manicure and one that looks flat is usually the finish. A highly reflective top coat adds depth, especially under natural light, while precise cuticle work keeps the color looking intentional. Medium length provides enough surface area for the black polish to look rich without pushing the manicure into an overly dramatic silhouette.
This is also a strong base if you later want to add one subtle detail, such as a chrome accent or a tiny metallic star, without rebuilding the entire design.
Best for: Anyone who prefers sophisticated Halloween nails over character-based nail art.
4. Matte Black Nails With Glossy Spiderwebs
Using two different finishes of the same color creates a manicure that appears simple from a distance but becomes much more interesting when the light moves across it. A matte black base absorbs light, while thin glossy black spiderwebs reflect it, producing a tonal design without introducing another color.
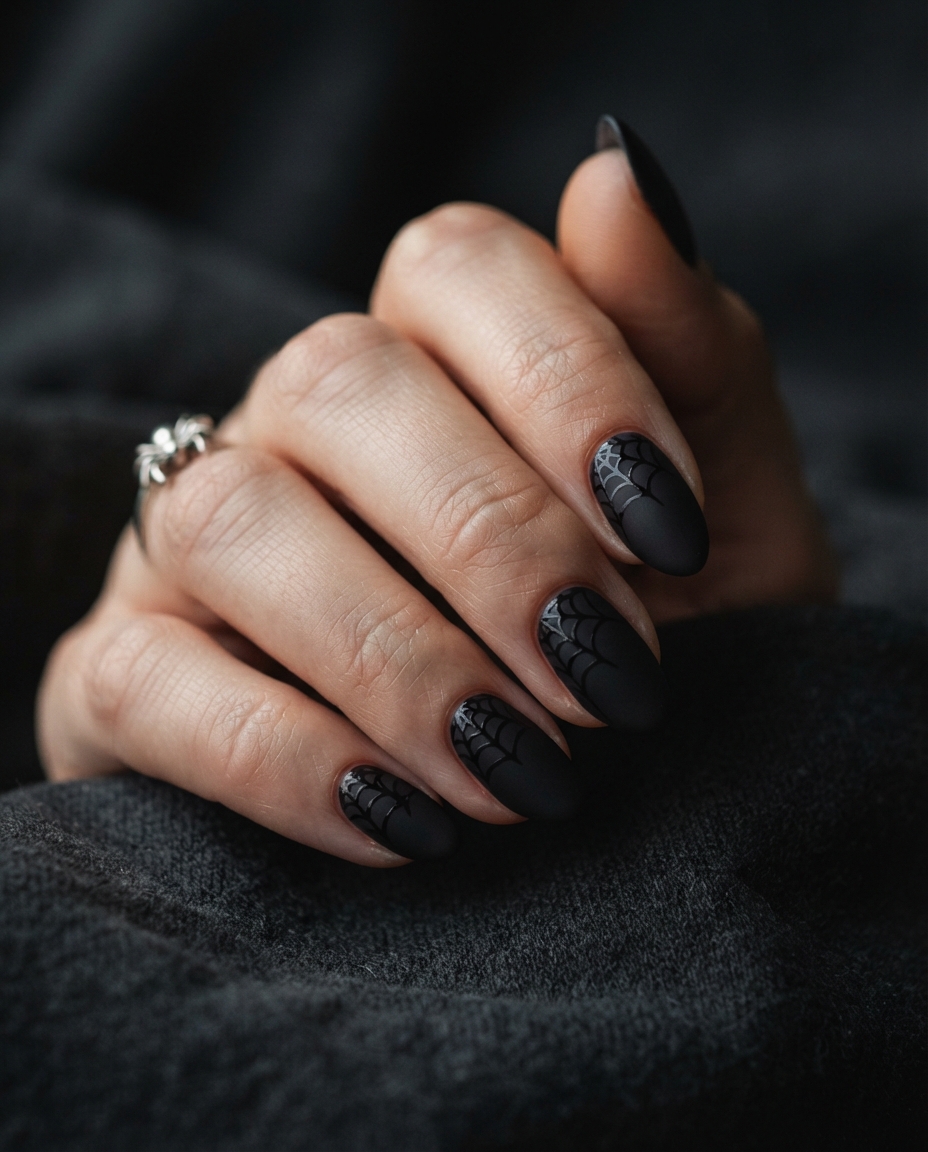
Because the contrast comes from texture rather than pigment, the spiderweb detail can be slightly larger than it would be on a nude manicure without becoming overwhelming. The webs work particularly well when placed in corners rather than centered on every nail, as if they are extending naturally from the edge.
Medium coffin, almond, or oval nails all provide enough surface for the design. Keeping the web lines thin is essential; thick lines remove the delicate quality that makes the tonal effect work.
Best for: Dark manicure lovers who want Halloween nail art that feels more sophisticated than playful.
5. Burgundy Blood-Drip French Tips
Blood-drip nail art can easily become theatrical, but using deep burgundy instead of bright red gives the idea a much more polished appearance. Begin with a translucent nude base and create a French-style tip that appears to drip downward in a few irregular rounded lines.
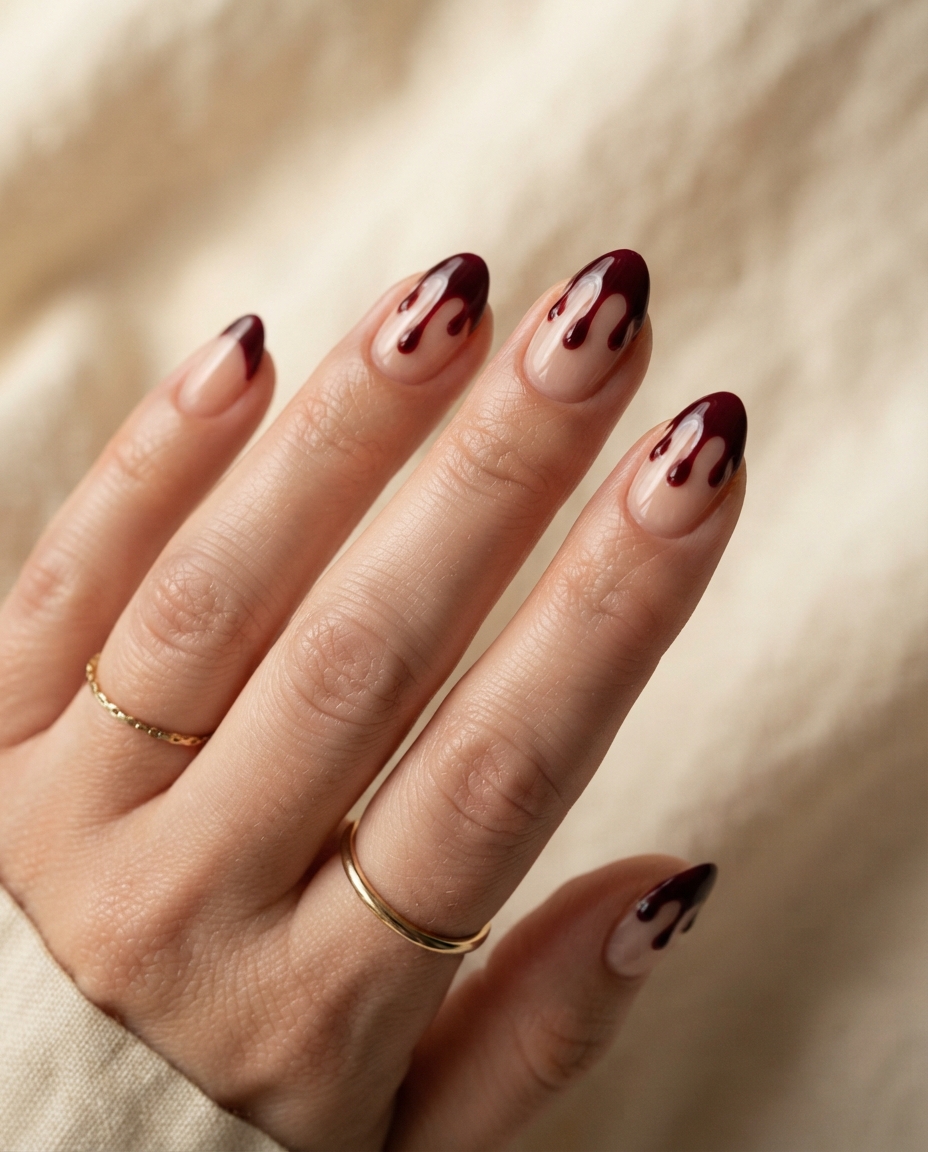
The richer wine shade keeps the manicure connected to autumn even when the Halloween theme is obvious. It also works beautifully with gold jewelry, dark clothing, and warm neutral outfits in a way that bright costume-red sometimes does not.
Keep the drips relatively short. Long streaks reaching halfway down the nail make the design far more dramatic, while two or three small drops at the edge maintain the French-manicure structure.
Best for: Anyone who wants obvious Halloween nails without using ghosts, pumpkins, or cartoon illustrations.
6. Burnt Orange Pumpkin Nails
Pumpkin nail art does not have to mean bright orange cartoon pumpkins across every finger. A more refined version uses muted burnt orange, terracotta, and creamy beige tones to create a manicure that feels equally appropriate for early autumn and Halloween week.
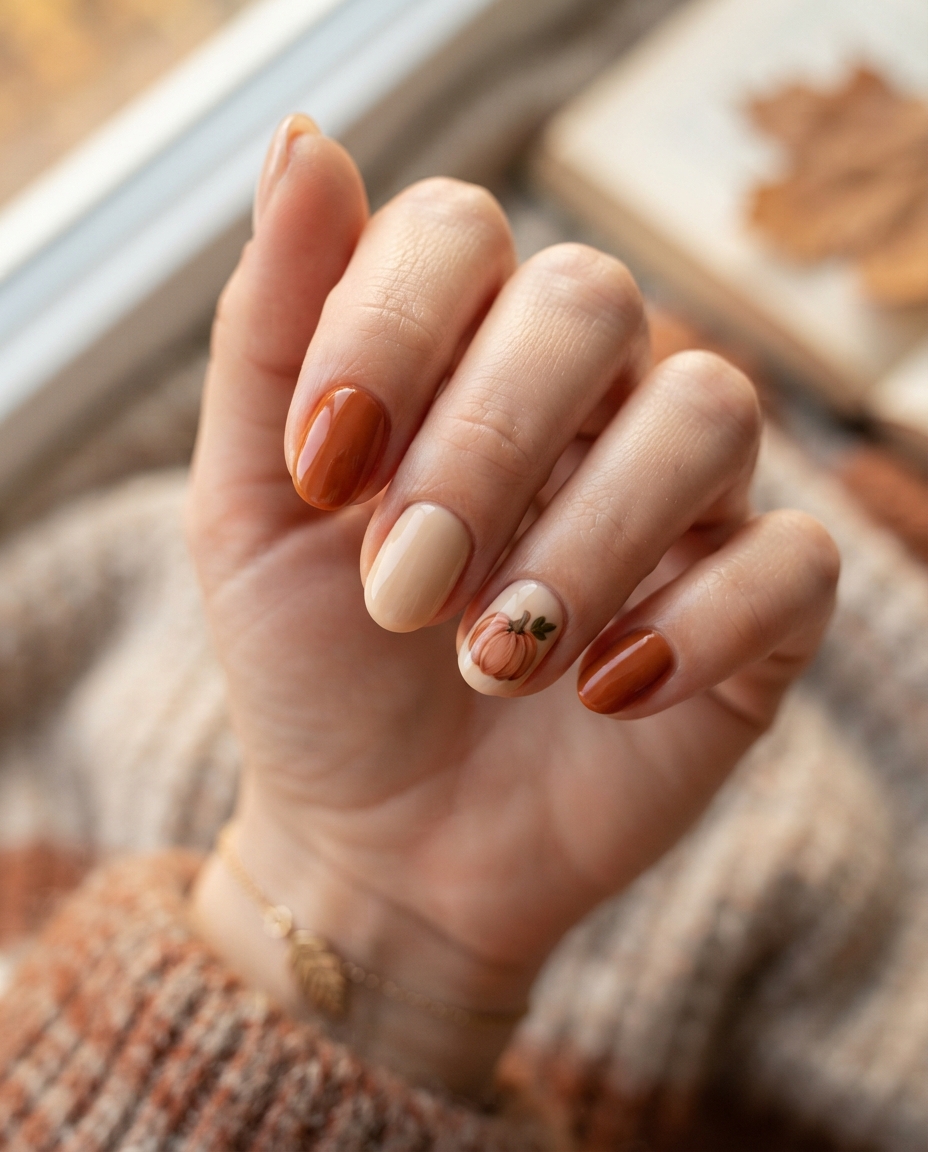
Keep most of the nails a solid warm neutral or translucent nude, then add one miniature pumpkin to an accent nail. The pumpkin can be created with soft curved orange lines and a tiny brown or olive stem rather than heavy black outlines.
This approach gives the design more of an autumn illustration quality than a novelty Halloween appearance. Short oval or squoval nails complement the cozy color palette especially well.
Best for: Anyone who wants seasonal nails that can be worn comfortably throughout October.
7. Chrome Black Cat-Eye Nails
A black cat-eye manicure creates its Halloween effect through movement rather than illustration. Magnetic polish produces a concentrated reflective stripe that shifts across the nail when the hand changes angle, making the dark base appear almost three-dimensional.
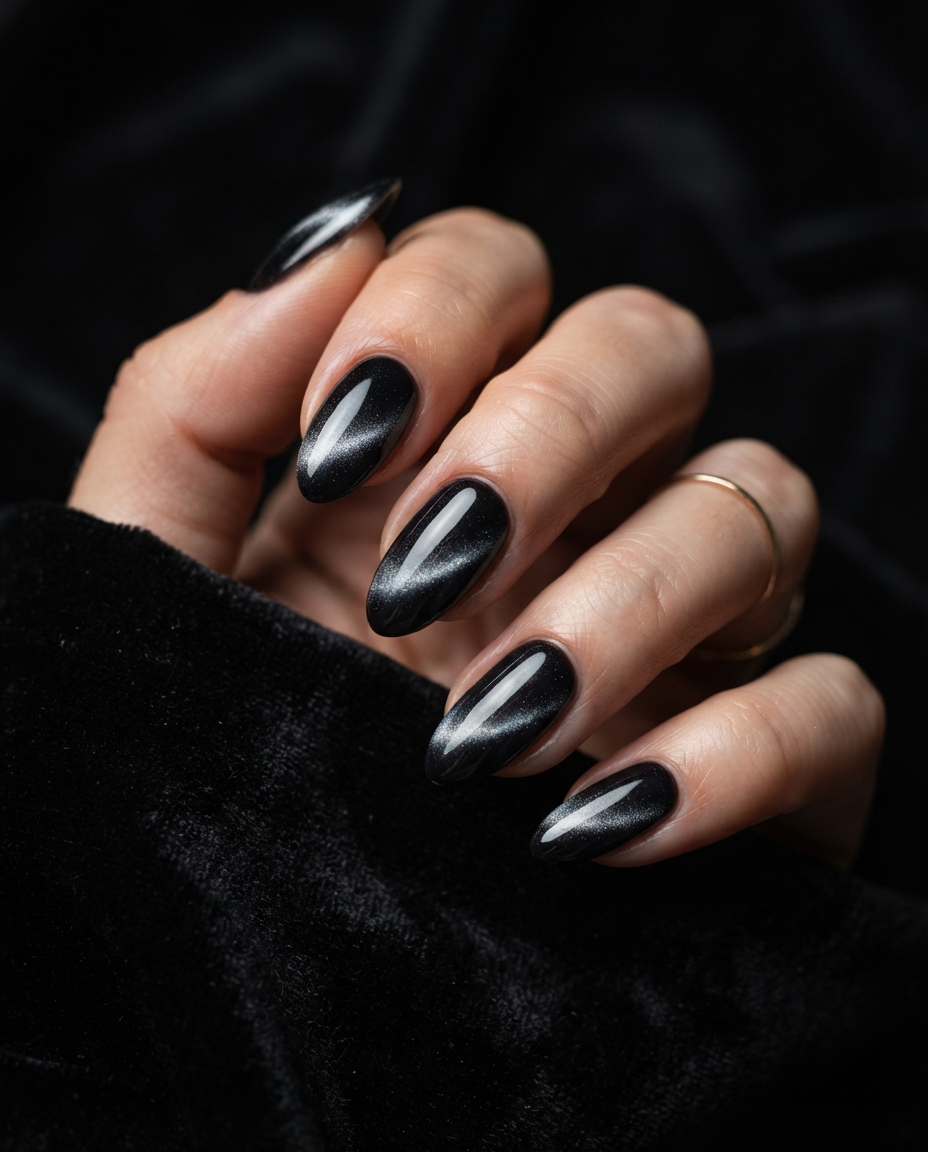
For Halloween, choose black, charcoal, or extremely dark plum with a silver or smoky magnetic reflection. The result has an almost mysterious depth without requiring any additional artwork. On almond nails, the moving highlight emphasizes the tapered shape particularly well.
The manicure can remain completely monochromatic, or one nail can include a tiny silver star if you want a celestial element. Resist the urge to add several competing effects; the magnetic finish is already the visual focal point.
Best for: Anyone who wants dramatic Halloween nails with no literal Halloween imagery.
8. Nude Nails With Tiny Black Bats
Small black bat silhouettes create a much cleaner manicure than covering each nail with detailed Halloween illustrations. A translucent nude base keeps the hand looking light and natural, while two or three carefully positioned bats add recognizable seasonal detail.
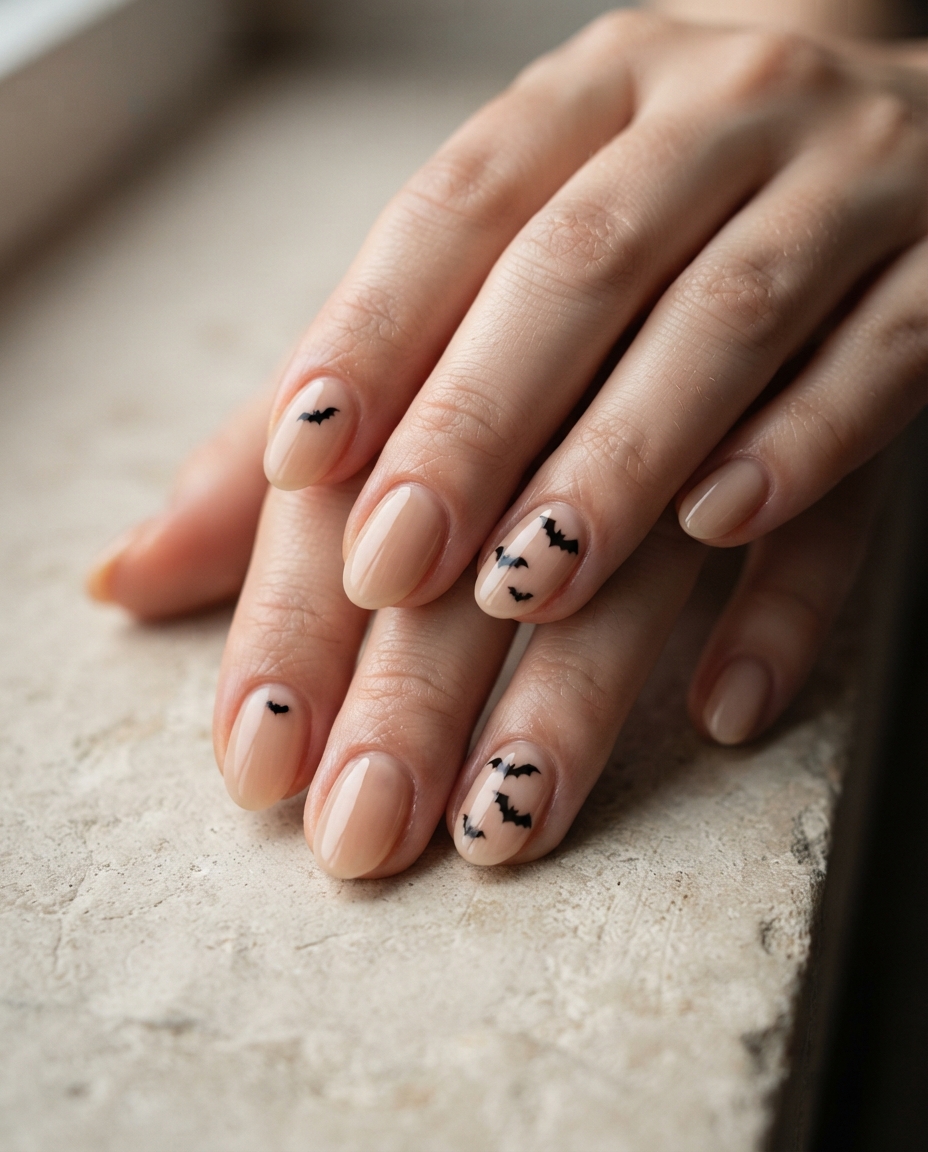
Variation makes this design more believable. Instead of repeating the same bat on every nail, ask for slightly different sizes and positions, as though they are moving across the manicure. One nail might have a single bat near the tip, while another has two tiny silhouettes near the side.
The artwork looks especially elegant on almond or oval nails because there is enough space for the bats without requiring a long extension.
Best for: Cute Halloween nails that still feel grown-up and wearable.
9. Smoky Grey Marble Nails
Grey marble nails can look atmospheric enough for Halloween without including a single seasonal symbol. The effect resembles drifting smoke, storm clouds, or mist, particularly when different shades of charcoal, translucent grey, and black are blended loosely across the nail.
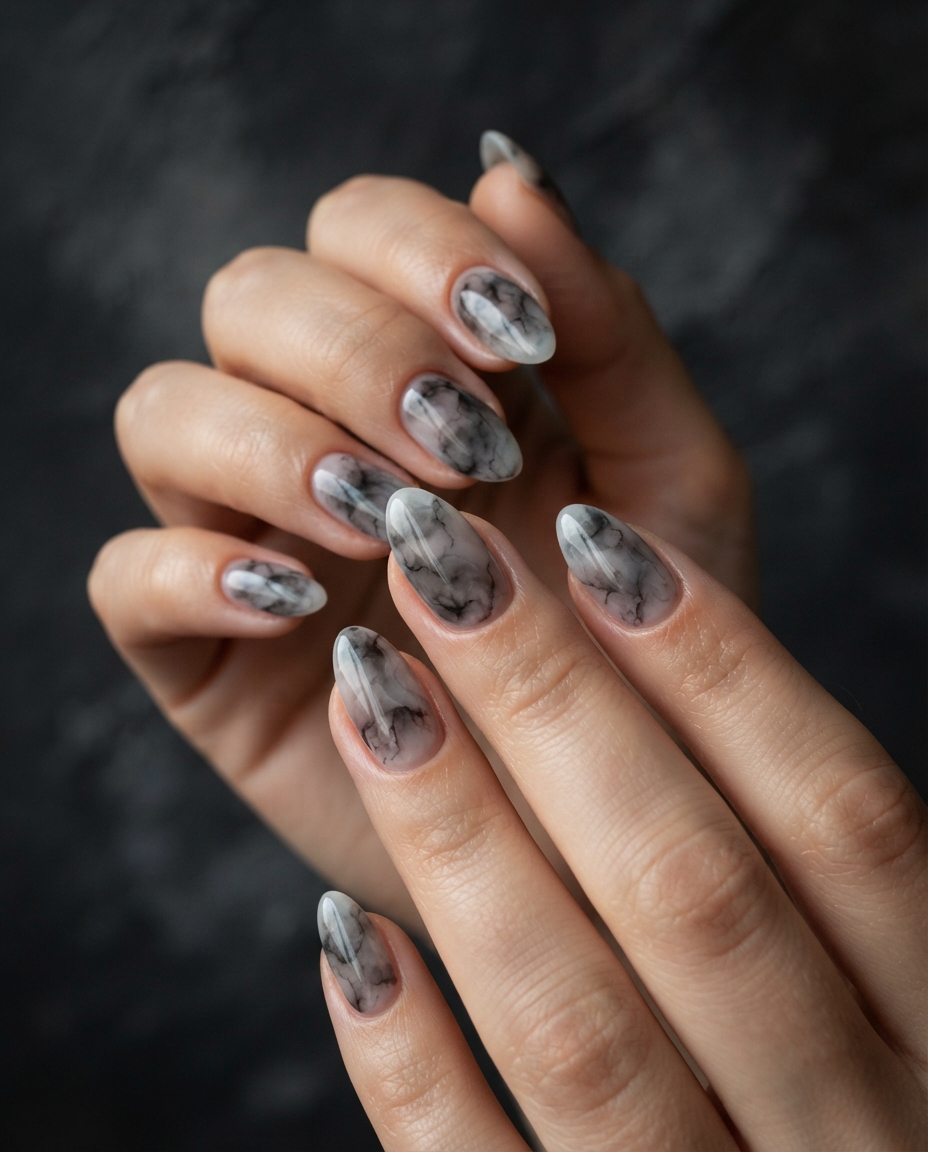
The most elegant version avoids sharply defined marble veins. Instead, the shades should appear diffused and irregular, almost as though the color is suspended inside the polish. A glossy top coat deepens the layers and creates a polished stone-like finish.
Use the smoky effect on every nail for a dramatic set, or alternate it with solid charcoal to make the manicure slightly quieter.
Best for: People who prefer abstract nail art and dark neutral color palettes.
10. White Ghost French Tips
A ghost French manicure turns the traditional tip into the character itself. Rather than painting a straight white edge, the polish extends downward in soft rounded shapes that resemble tiny ghost bodies, with small black eyes added near the top.
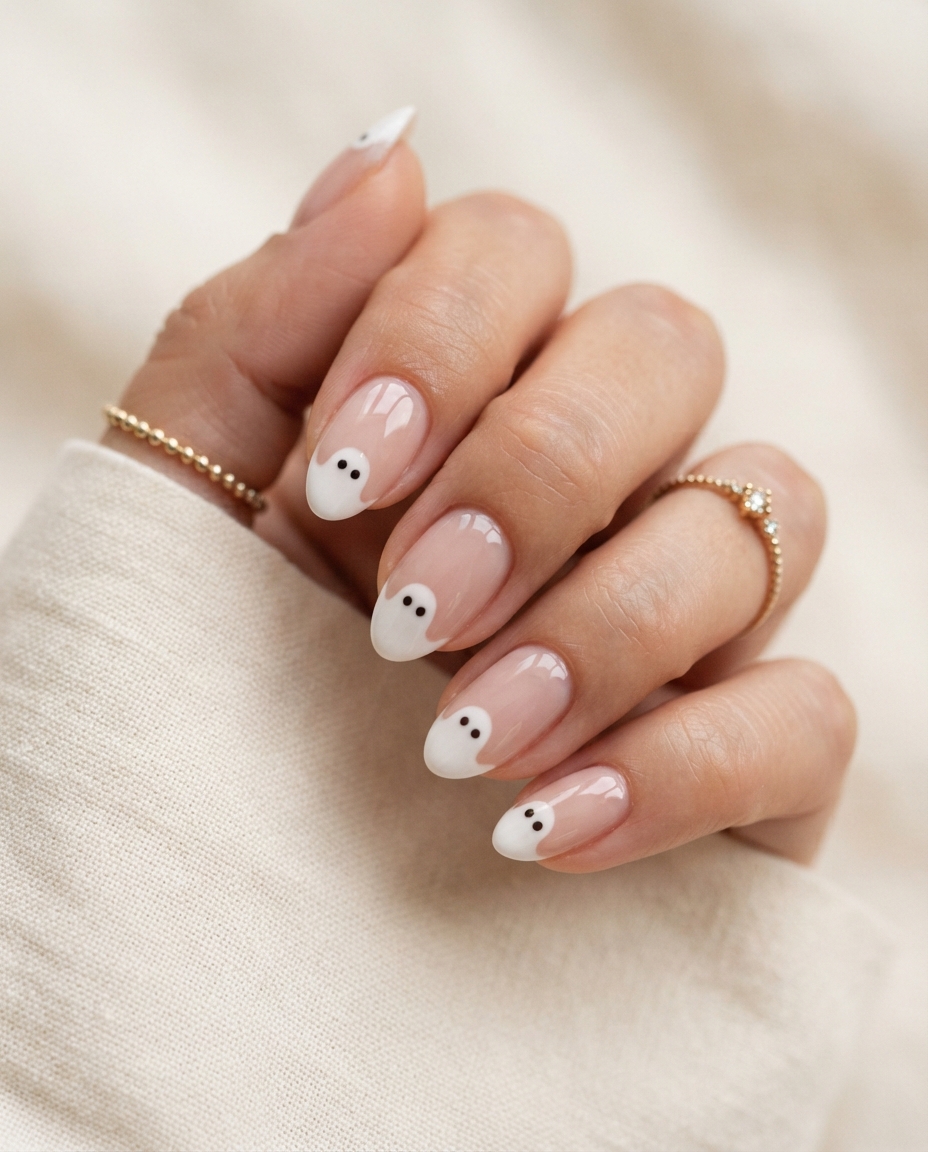
This design works particularly well because the Halloween element is built into the structure of the manicure rather than added on top of it. A nude or pale pink base maintains the familiar French aesthetic, while the irregular white tips give it personality.
Keep the ghosts relatively shallow so the design remains recognizable as a French manicure. On very long nails, exaggerated ghost shapes can become more cartoon-like, so medium-short almond or square lengths often produce the most balanced result.
Best for: Anyone who wants a playful Halloween manicure that still feels neat and coordinated.
11. Black-and-White Checkerboard Accent Nails
Checkerboard nail art brings Halloween contrast without relying on traditional symbols. The strong black-and-white pattern has enough visual energy to feel festive, particularly when paired with solid black nails or a nude base.
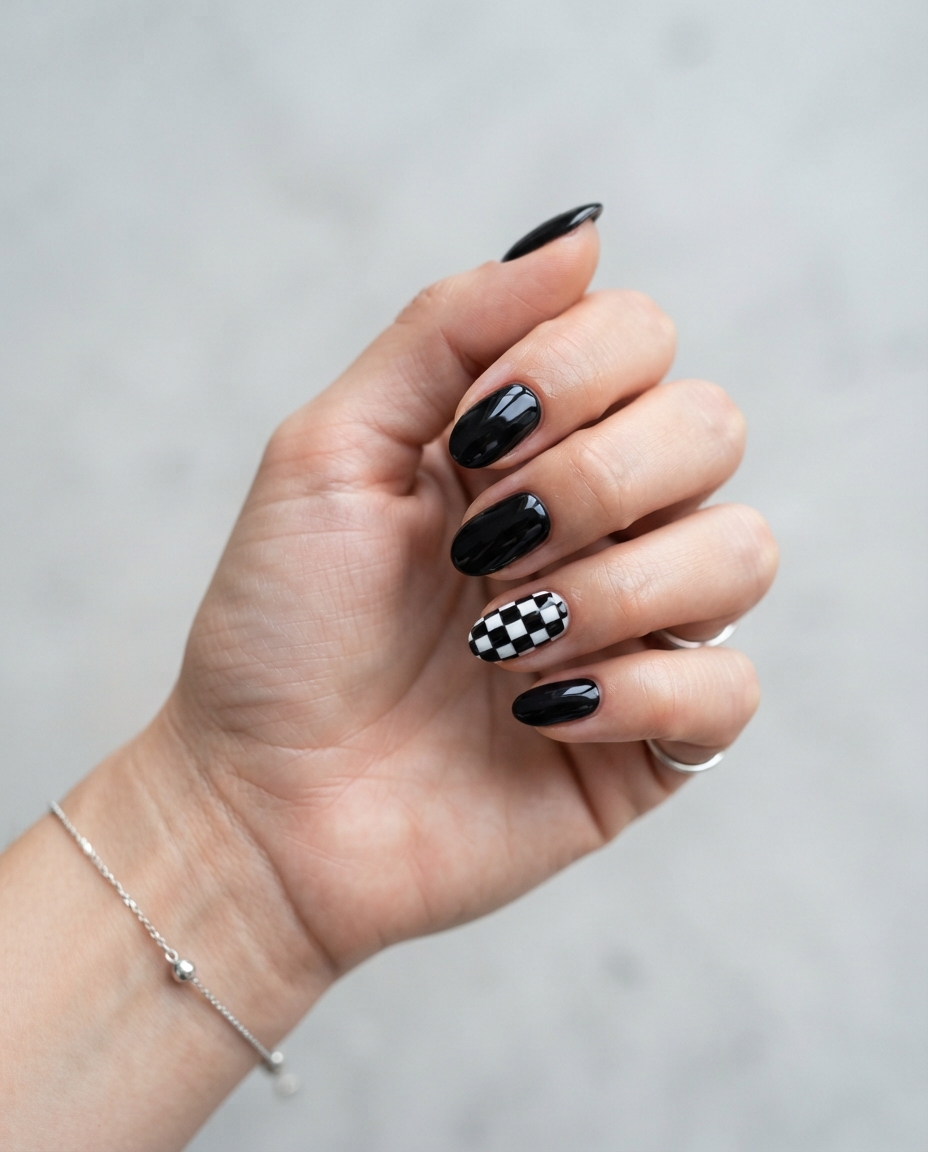
The easiest way to keep the manicure sophisticated is to restrict the pattern to one or two accent nails. Covering all ten nails can quickly make the design feel very busy, while a single checkerboard nail creates deliberate contrast against glossy black, creamy white, or translucent nude.
Smaller squares also tend to look more refined than oversized ones, especially on shorter nails.
Best for: Graphic nail-art lovers who want something seasonal but not literal.
12. Deep Plum Nails With Tiny Gold Stars
Deep plum creates the darkness associated with Halloween while remaining softer and richer than black. A nearly-black violet base can appear mysterious indoors and reveal a subtle wine-purple tone when exposed to stronger light.
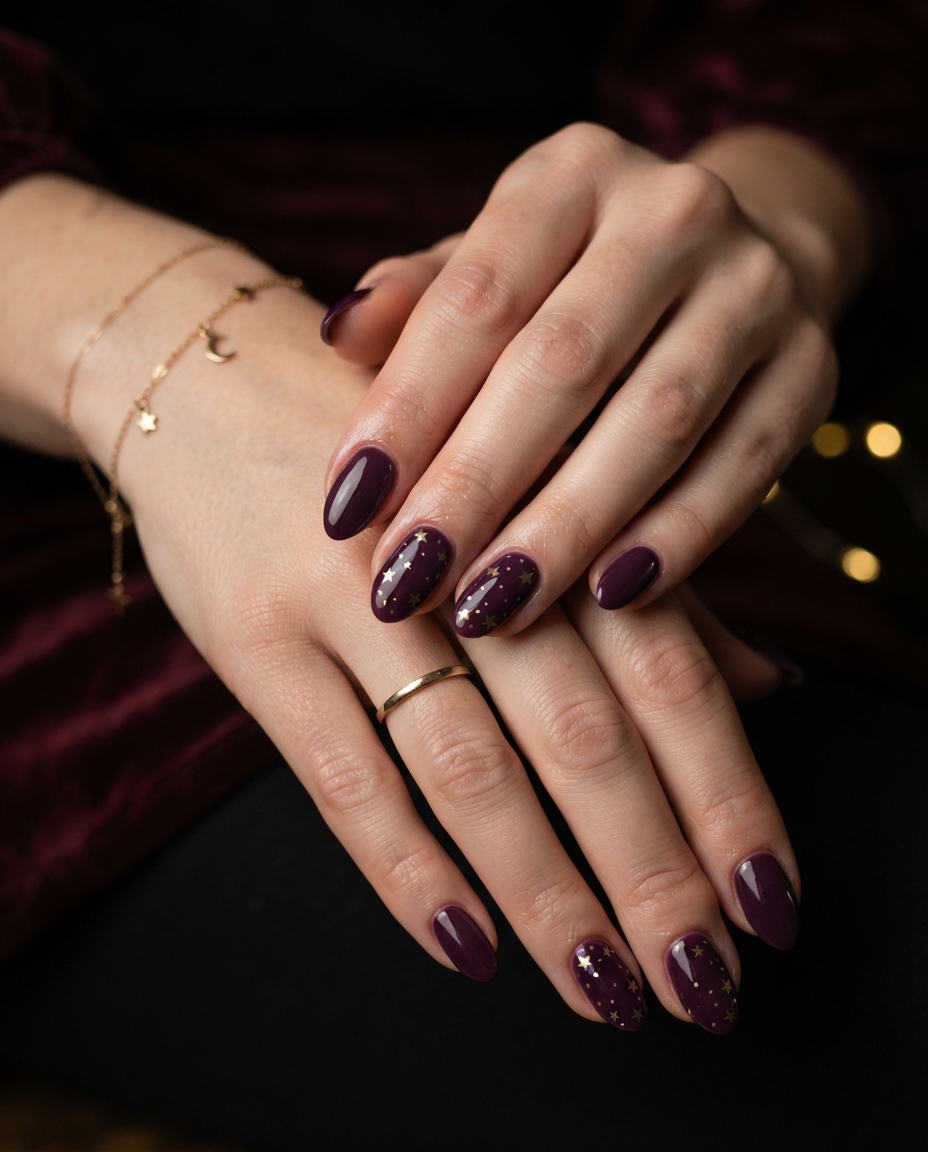
Adding a few tiny gold stars creates a night-sky effect without turning the manicure into full celestial nail art. The stars should be small and scattered irregularly, with perhaps one or two nails left completely plain to keep the composition balanced.
Gold also adds warmth to the cool plum base, making the manicure particularly beautiful with autumn clothing and jewelry.
Best for: Anyone who wants dark Halloween nails with a slightly romantic feel.
13. Skeleton Hand Accent Nail
Skeleton nail art can be extremely detailed, which is exactly why it works best when concentrated on a single accent nail. Keep the remaining nails black, nude, or deep burgundy and use one nail for a fine white skeletal hand illustration.
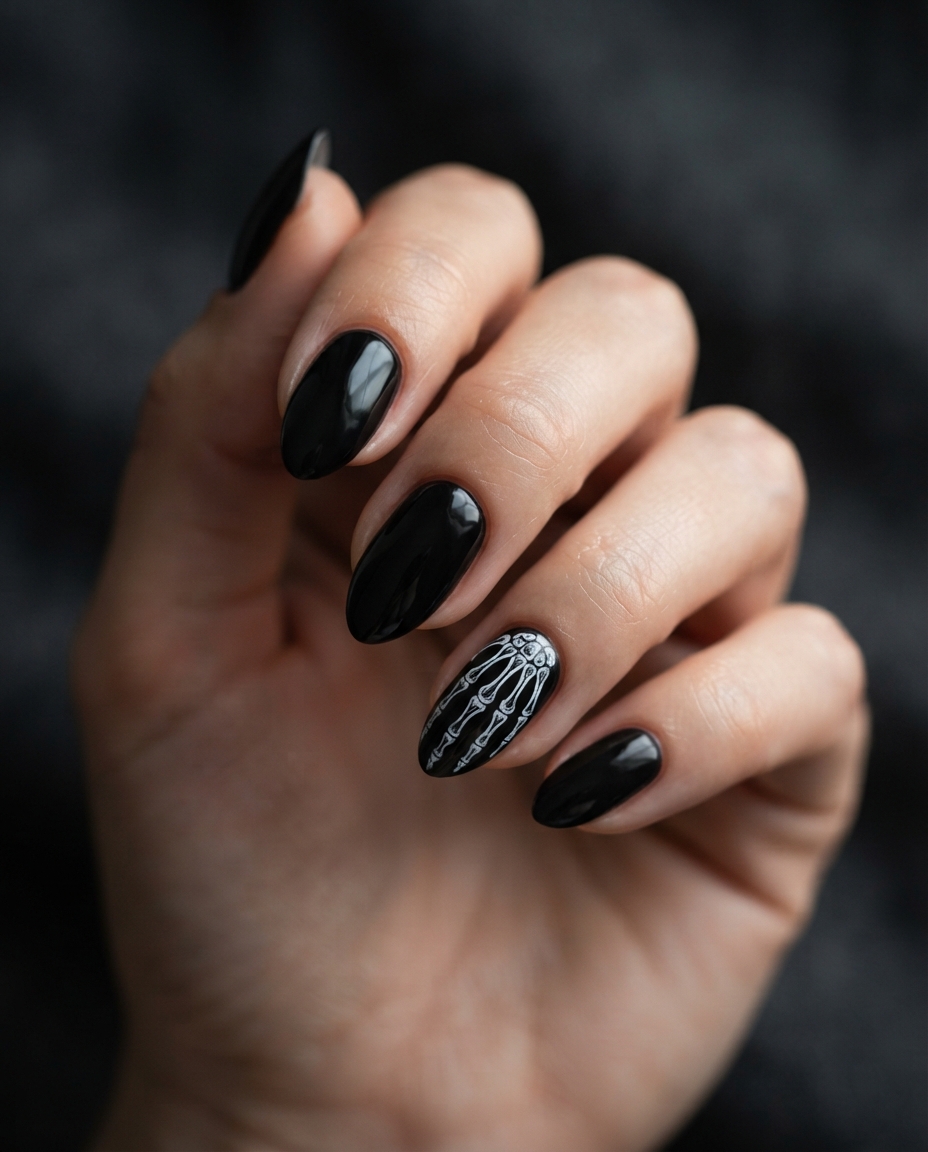
A minimalist line-drawing style tends to look more sophisticated than a heavily shaded anatomical design. The bones should be thin, slightly imperfect, and clearly visible against the base color without filling every inch of the nail.
This creates one strong focal point while allowing the overall manicure to remain wearable.
Best for: Halloween lovers who want detailed art without placing complicated illustrations on every finger.
14. Black Aura Nails
Aura nails use a diffused center of color that gradually fades toward another shade at the edges. For Halloween, a black or charcoal aura fading into nude, smoky grey, or deep burgundy creates an eerie soft-focus effect.
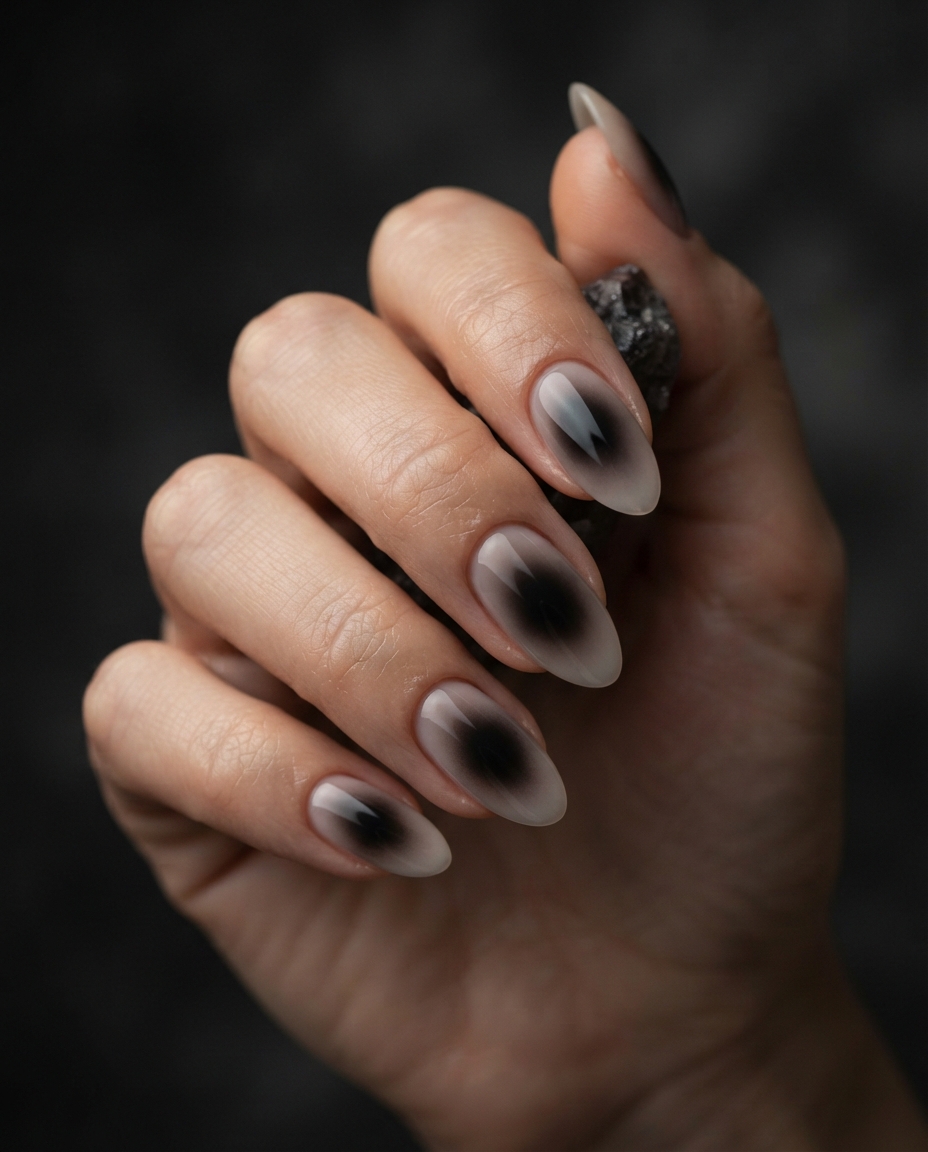
The design feels darker than a traditional ombré because the color appears concentrated within the center of the nail, almost like a shadow. A glossy finish preserves the depth and prevents the manicure from looking chalky.
Because the transition itself is the design, additional artwork is usually unnecessary.
Best for: Anyone who wants modern Halloween nails without recognizable Halloween characters.
15. Tiny Spider Accent Nails
A spider can look surprisingly delicate when reduced to its simplest form. Start with a nude or milky base and add one tiny black spider near the corner of one or two nails, using an extremely small body and fine legs.
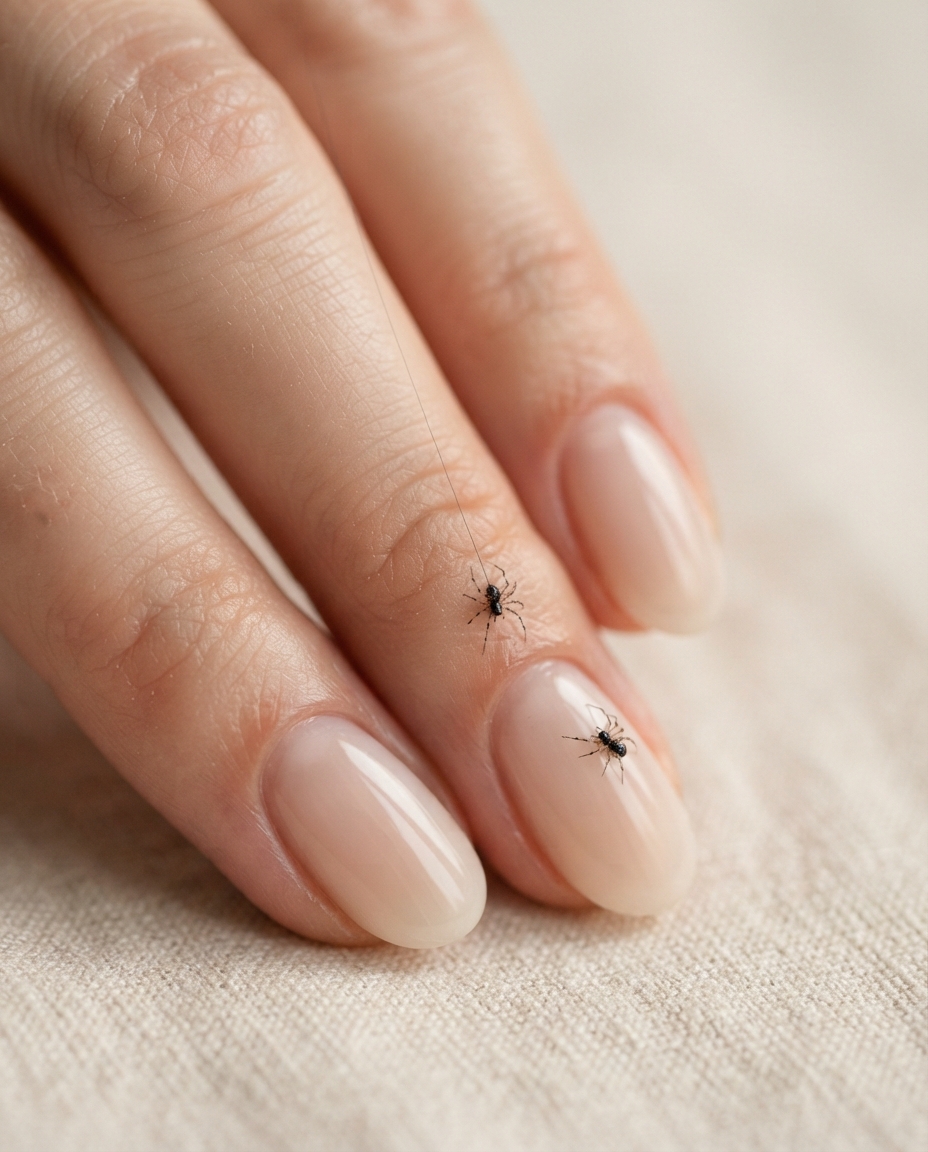
The placement is what makes this work. Centering a large spider on every nail would make the manicure much more theatrical, whereas a tiny off-center illustration almost looks like a hidden detail that becomes visible only when someone looks closely.
One fine thread extending from the tip or side of the nail can add extra interest without requiring a full spiderweb.
Best for: Minimal Halloween nail art with a slightly creepy detail.
16. Orange Micro French Tips
Bright orange can feel overwhelming when used across an entire manicure, but reducing it to a micro French tip creates a completely different effect. The thin line introduces unmistakable Halloween color while the nude base keeps most of the nail natural.
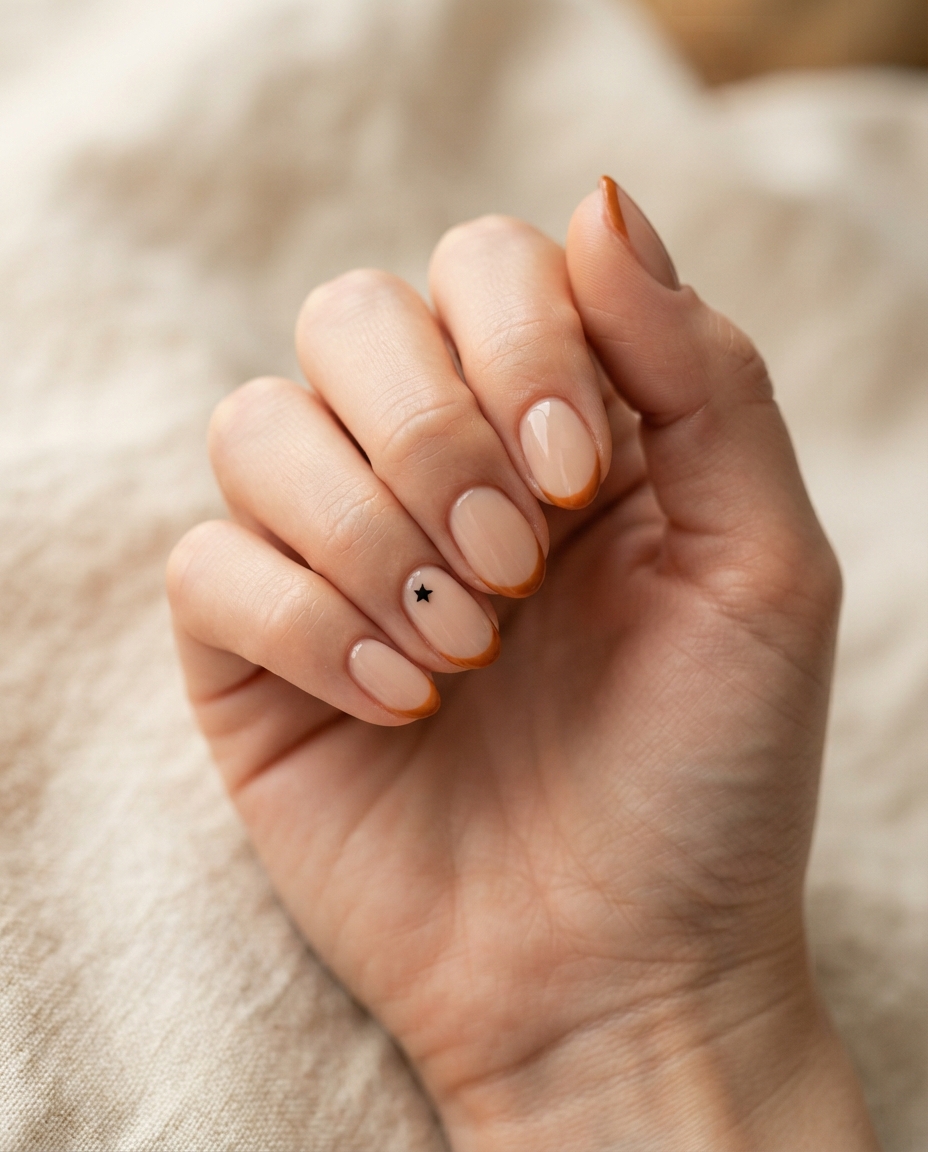
A burnt pumpkin orange usually looks more sophisticated than neon orange, especially if you want the manicure to transition smoothly into the rest of autumn. Short almond, oval, and squoval nails all suit the design.
For a tiny extra detail, one nail can have a miniature black dot, star, or crescent near the cuticle, but the manicure works perfectly well without it.
Best for: People who want festive color without character nail art.
17. Midnight Blue Celestial Nails
Halloween does not have to rely entirely on black and orange. Midnight blue creates the same nighttime mood while offering something slightly less expected.
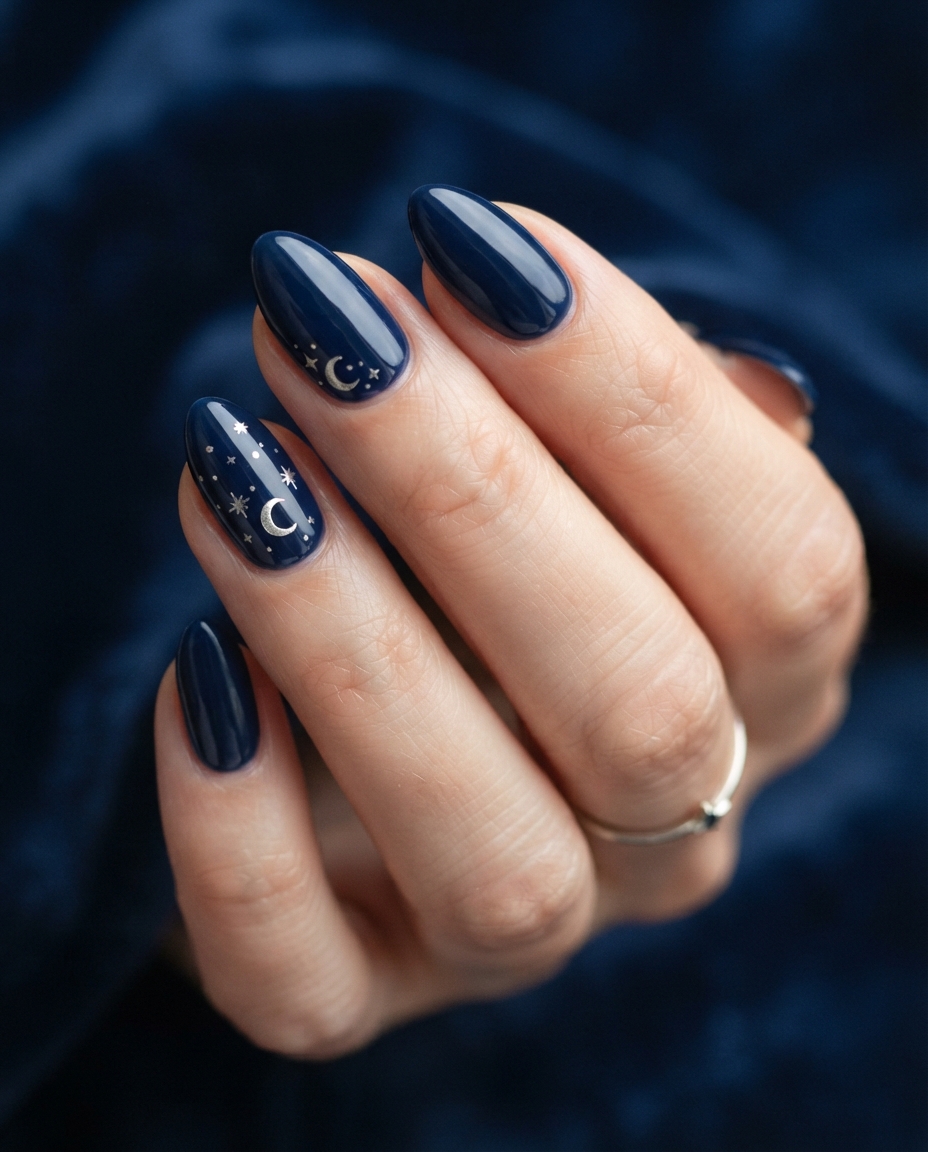
A very dark navy base can be paired with tiny silver moons, stars, and dots to create a restrained celestial manicure. Keep the illustrations thin and sparse rather than covering the nail in constellations.
The effect works particularly well under a glossy top coat because the deep navy reflects enough light to reveal its color rather than reading as flat black.
Best for: Anyone drawn to witchy or celestial Halloween aesthetics.
18. Black Chrome Nails
Black chrome gives a simple dark manicure far more dimension without requiring additional artwork. Instead of a flat black surface, the chrome finish reflects silver, graphite, and sometimes subtle blue undertones depending on the light.
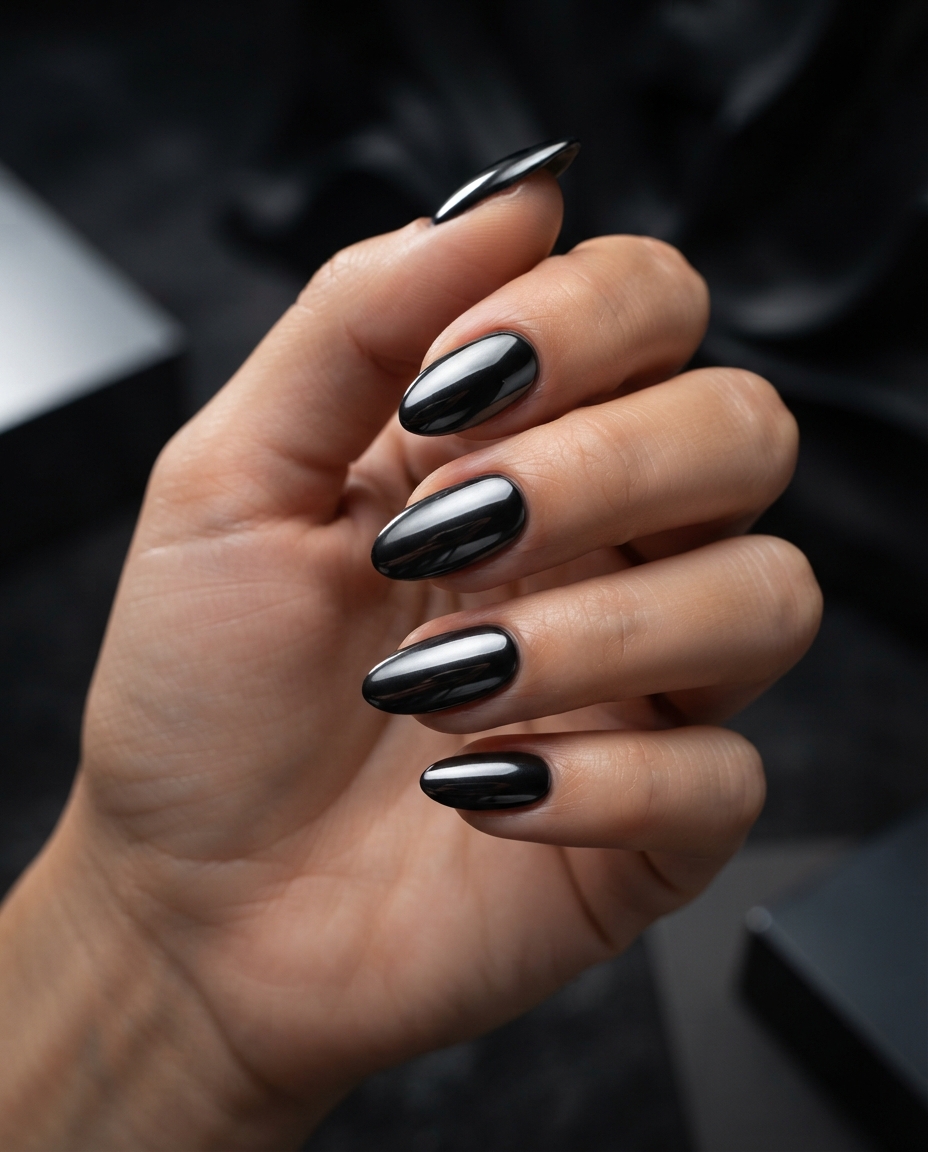
The effect is particularly striking on smooth almond or coffin nails because the curved surface catches the reflection differently across the nail. Keeping the shape neat and the design monochromatic allows the metallic finish to remain sophisticated.
This is one of the stronger options for anyone who wants Halloween nails that feel futuristic rather than cute.
Best for: Minimalists who still want a dramatic finish.
19. Vampire Red Gradient Nails
A red gradient can create a vampire-inspired manicure without using blood drops, fangs, or character illustrations. Begin with deep burgundy near the cuticle and gradually transition into brighter crimson toward the tip, or reverse the gradient for a darker edge.
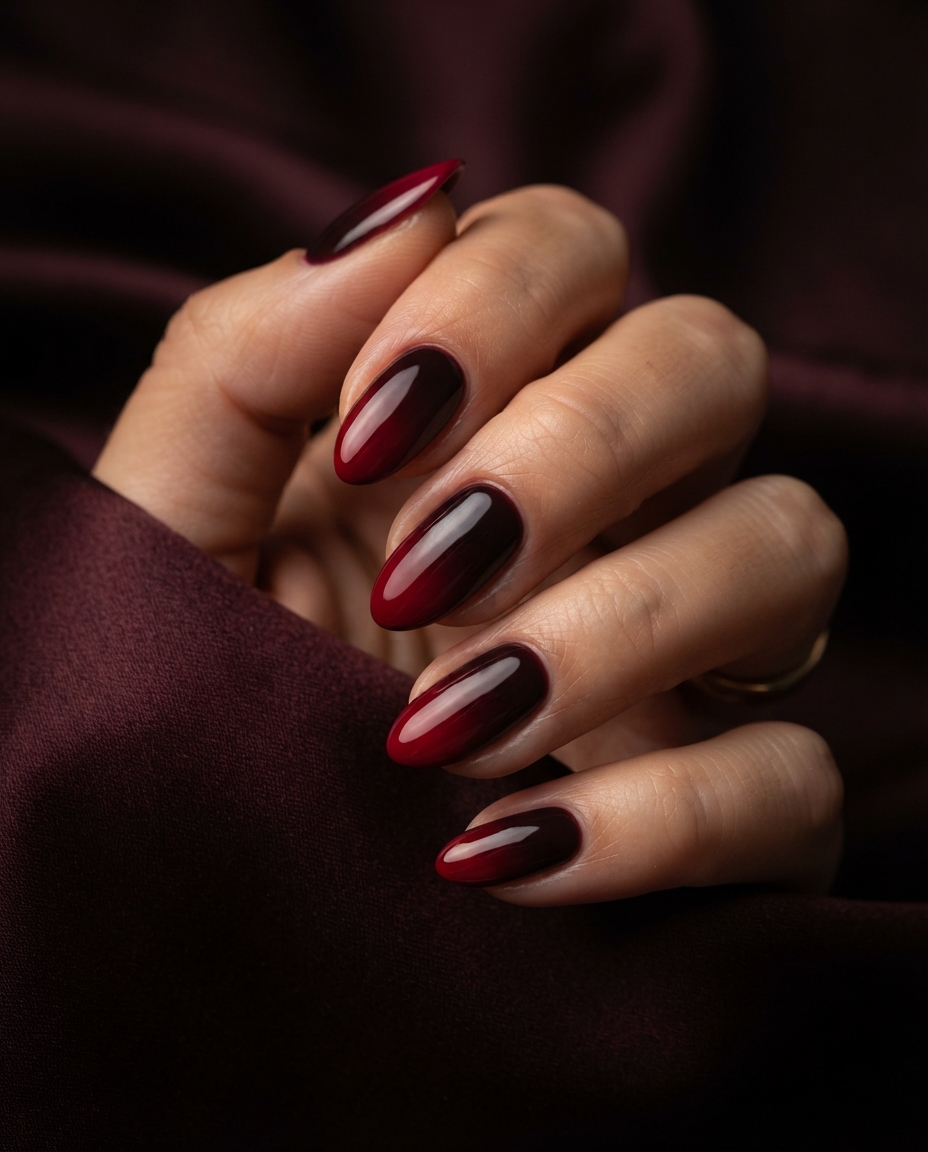
The result should feel rich rather than neon. Wine, garnet, oxblood, and classic red blend particularly well together because they share enough undertone to create a seamless transition.
A high-gloss finish intensifies the colors and gives the manicure the lacquered depth that makes red nails feel especially dramatic.
Best for: Anyone who loves classic red but wants a more atmospheric Halloween interpretation.
20. Black Flame French Tips
Flame nail art can look bold, but using black flames over a nude base keeps the design visually controlled. The flames begin at the free edge like a French tip and extend upward in narrow curved points, leaving most of the natural-looking base uncovered.
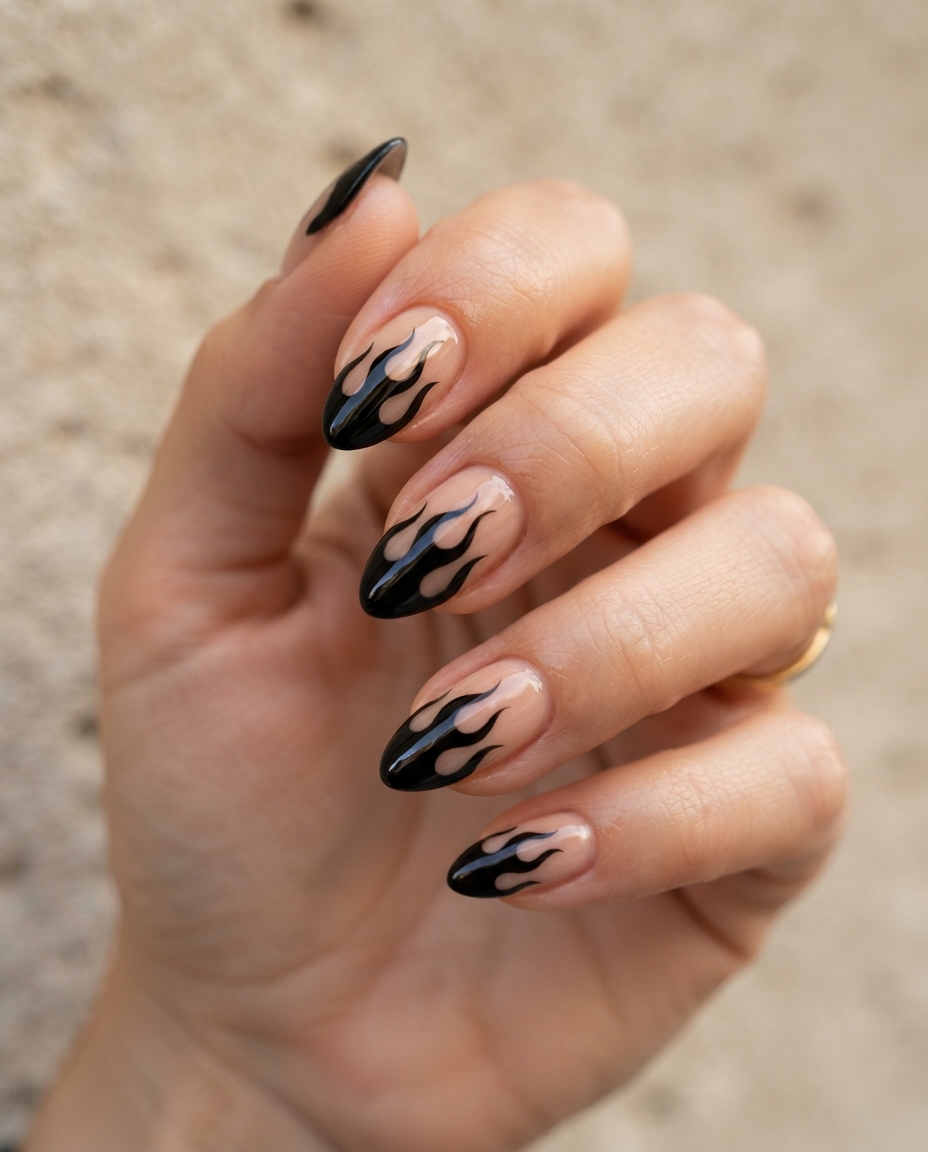
Because the design already has significant movement, it is best to avoid additional graphics. Medium almond nails complement the direction of the flames, making the shape appear even more tapered.
For a softer variation, use deep chocolate brown or burgundy instead of pure black.
Best for: Anyone who wants Halloween nails with a sharper, slightly alternative aesthetic.
21. Short Candy-Corn French Nails
Candy corn colors can easily become overly playful, so the most wearable interpretation uses them only at the tip. Instead of painting an entire nail in yellow, orange, and white, create a miniature layered French tip with three very thin bands.
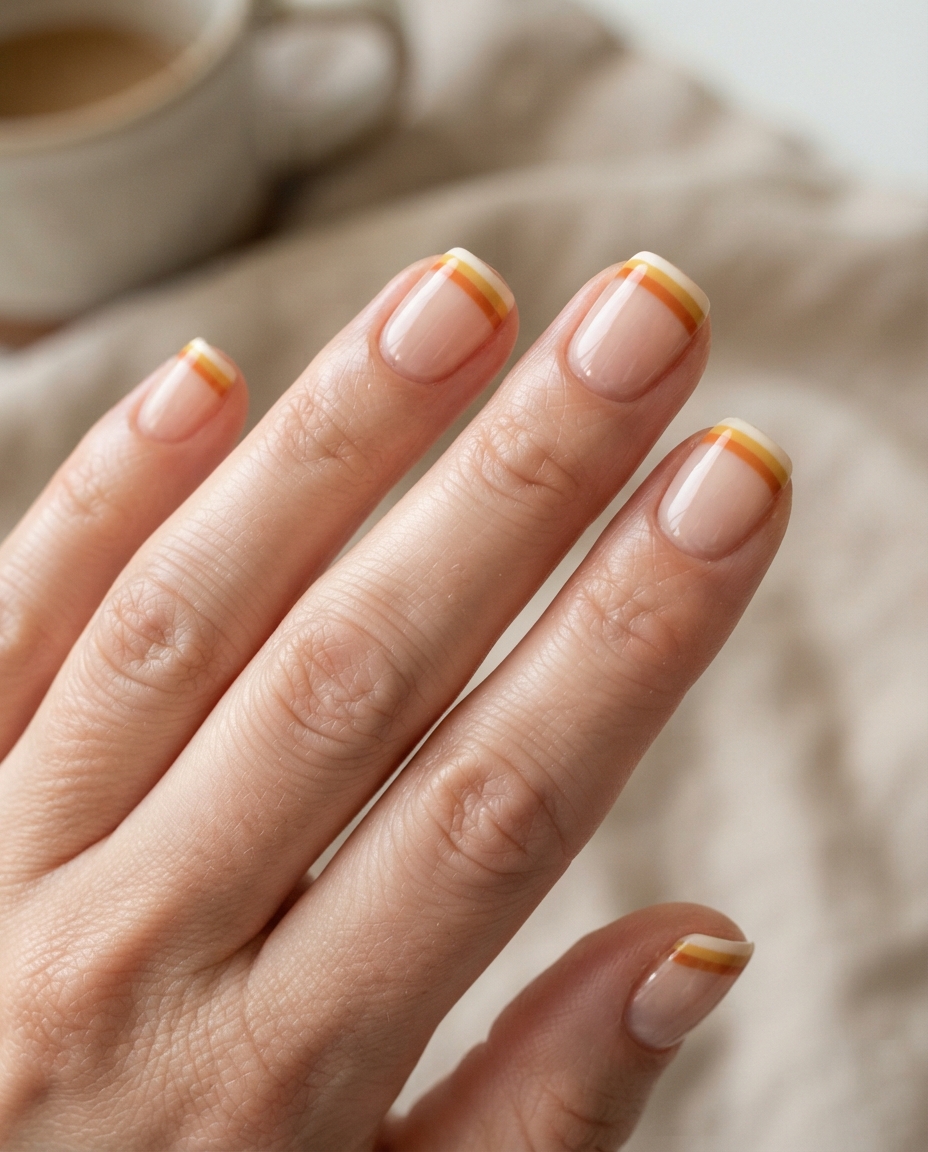
The nude base keeps the design light, while the recognizable color sequence creates the Halloween connection. Short squoval or oval nails are particularly good for this style because the tiny tip feels proportional to the nail.
Using muted cream, pumpkin orange, and soft mustard instead of extremely bright shades can make the manicure look significantly more refined.
Best for: Cute Halloween nails that still feel clean and relatively minimal.
22. Black Roses on Sheer Nude Nails
Floral nail art is not usually the first thing associated with Halloween, which is exactly why black roses can feel so interesting. Instead of bright romantic flowers, the dark petals create a gothic effect while the sheer nude base keeps the manicure light.
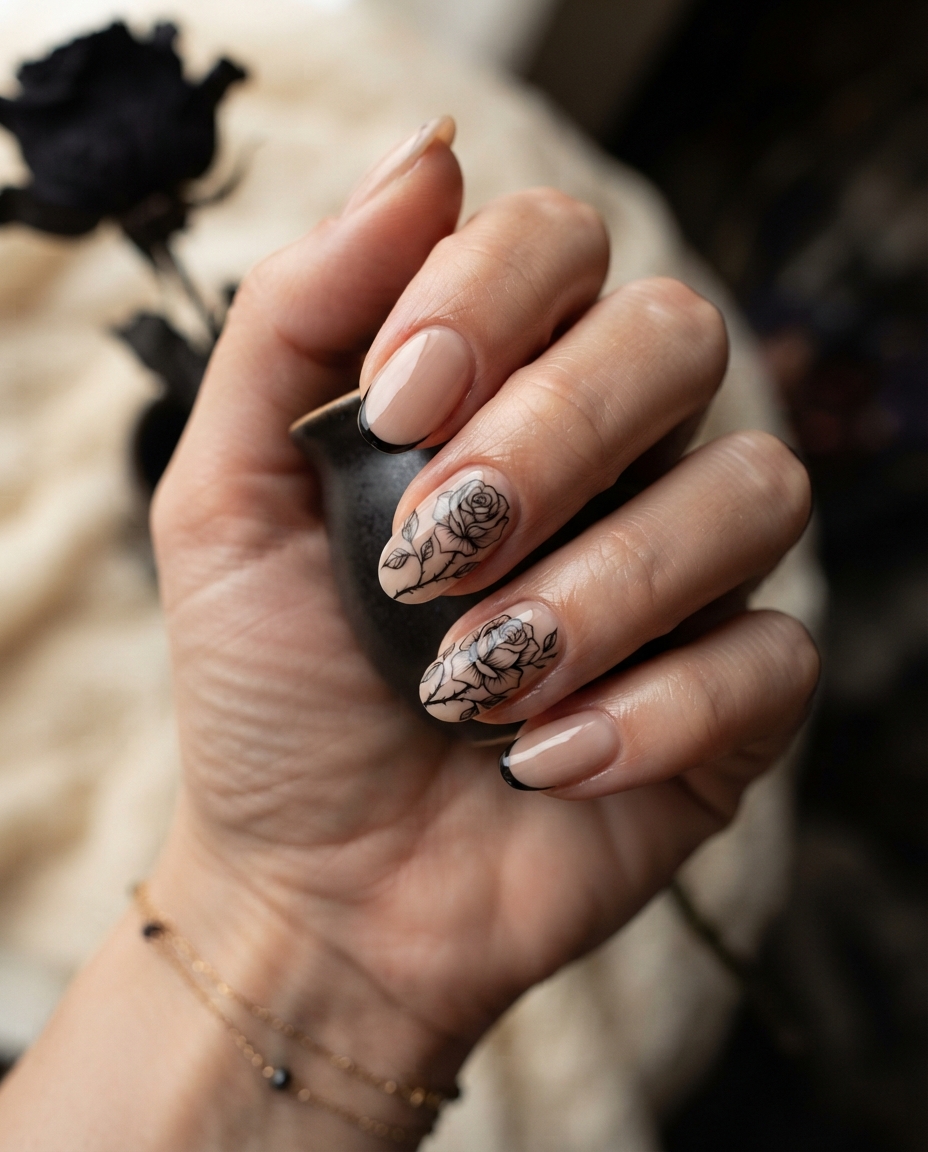
The roses should be fine and slightly abstract rather than heavily shaded. One flower extending partially from the side of a nail often looks more elegant than placing a centered rose on every finger.
Use only two or three floral accent nails and leave the rest plain or finished with a black micro French tip.
Best for: Romantic gothic styles and anyone who wants Halloween nails that do not use typical Halloween symbols.
23. Dark Tortoiseshell Halloween Nails
Tortoiseshell nails naturally use amber, caramel, espresso, and black tones, which makes them ideal for autumn even without additional Halloween art. Deepening the black patches slightly creates a richer October version while maintaining the sophisticated translucent appearance of traditional tortoiseshell.
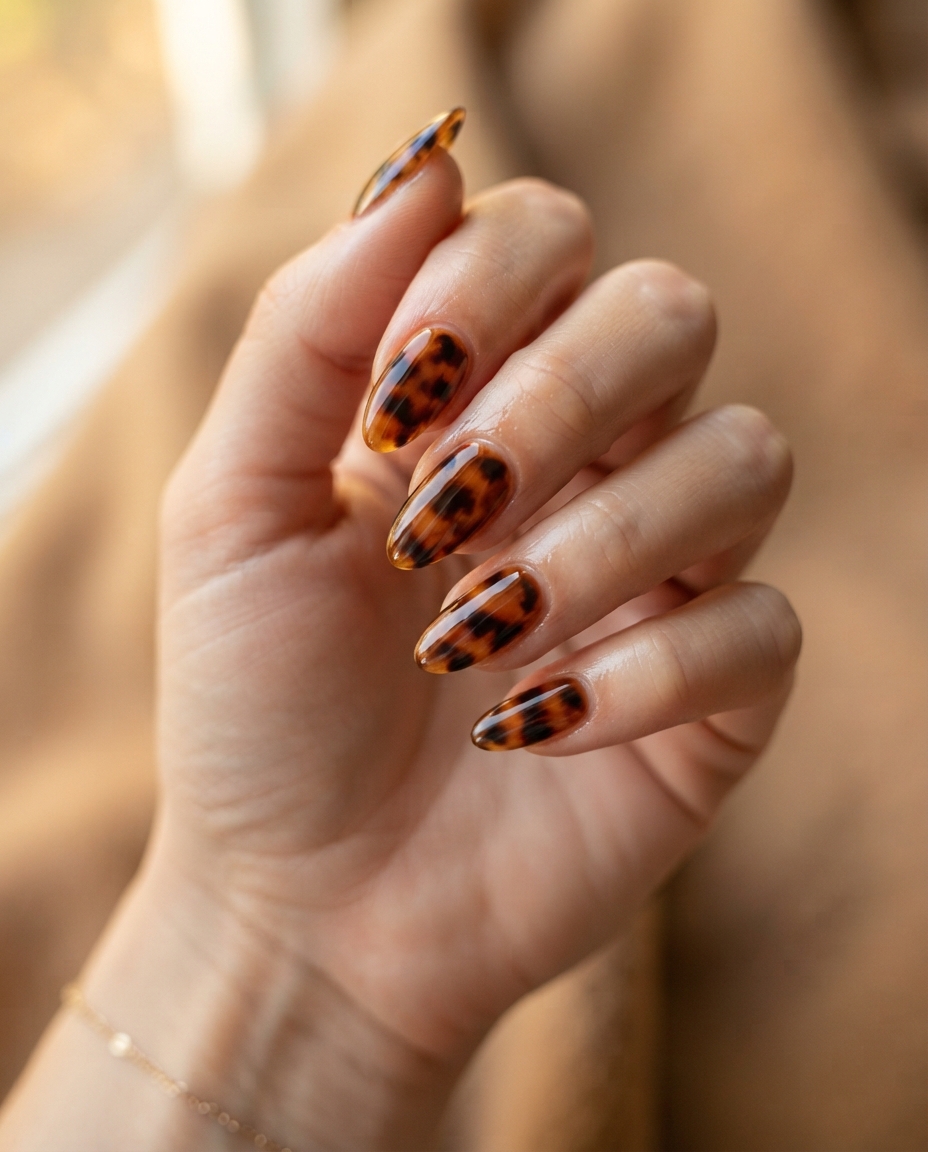
The secret is layering. A convincing tortoiseshell effect should look as if the darker spots are suspended beneath translucent amber rather than simply painted on top of an orange base.
You can wear the effect on every nail or combine it with glossy espresso brown for a quieter set.
Best for: Anyone who wants autumn and Halloween nails that do not look overtly themed.
24. Moon-Phase Nails
Moon-phase nail art gives a manicure a witchy quality without requiring obvious Halloween illustrations. A sheer nude, black, or deep navy base can be decorated with tiny crescents, half moons, and full moons arranged across several nails.
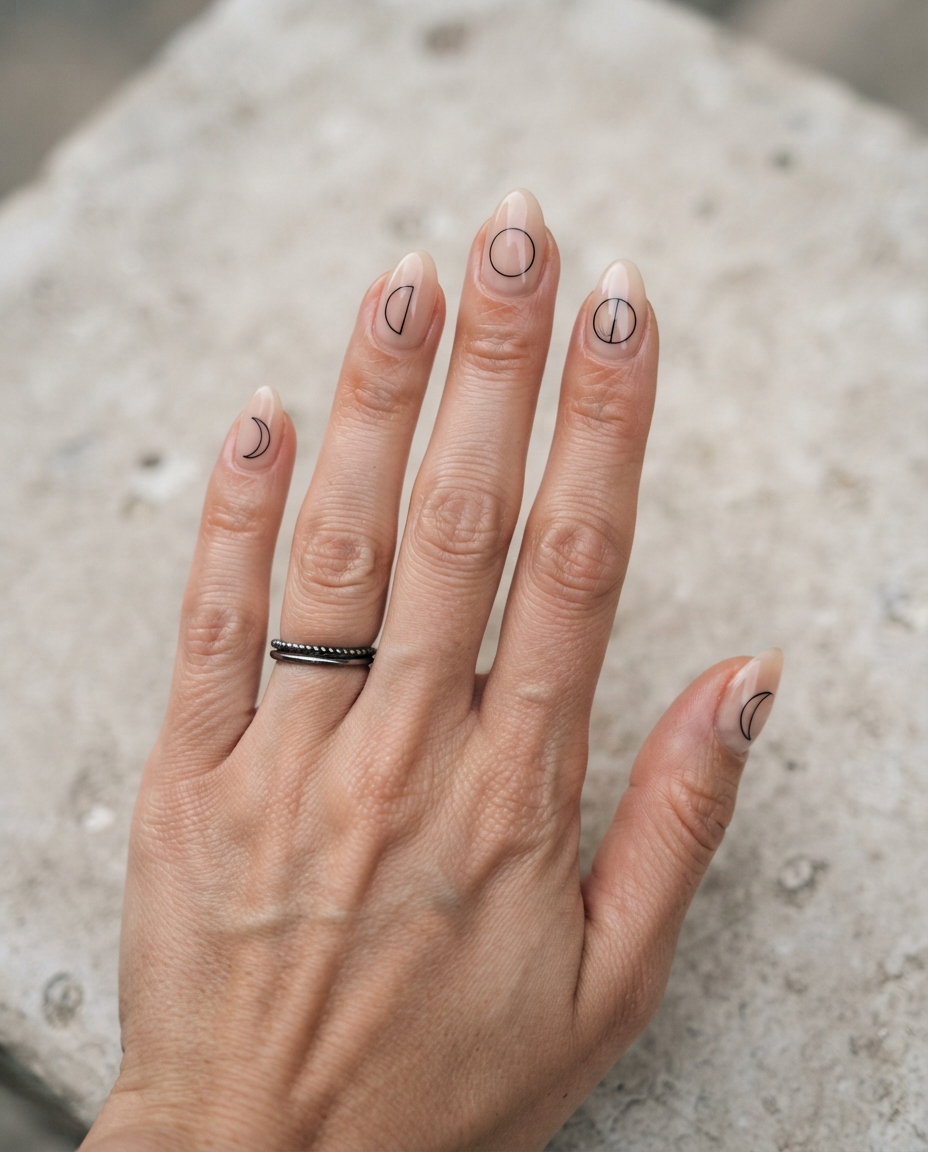
The most polished version avoids placing an entire detailed sequence on every nail. Instead, allow each finger to represent one stage, creating a subtle progression across the hand.
Metallic silver works beautifully over black, while fine black moon shapes look especially elegant over nude polish.
Best for: Celestial, witchy, and understated Halloween aesthetics.
25. Mixed Minimal Halloween Nails
If choosing one Halloween symbol feels impossible, the solution is not necessarily to cover every nail in detailed art. A mixed manicure can still look cohesive when every design uses the same limited palette and similar visual weight.
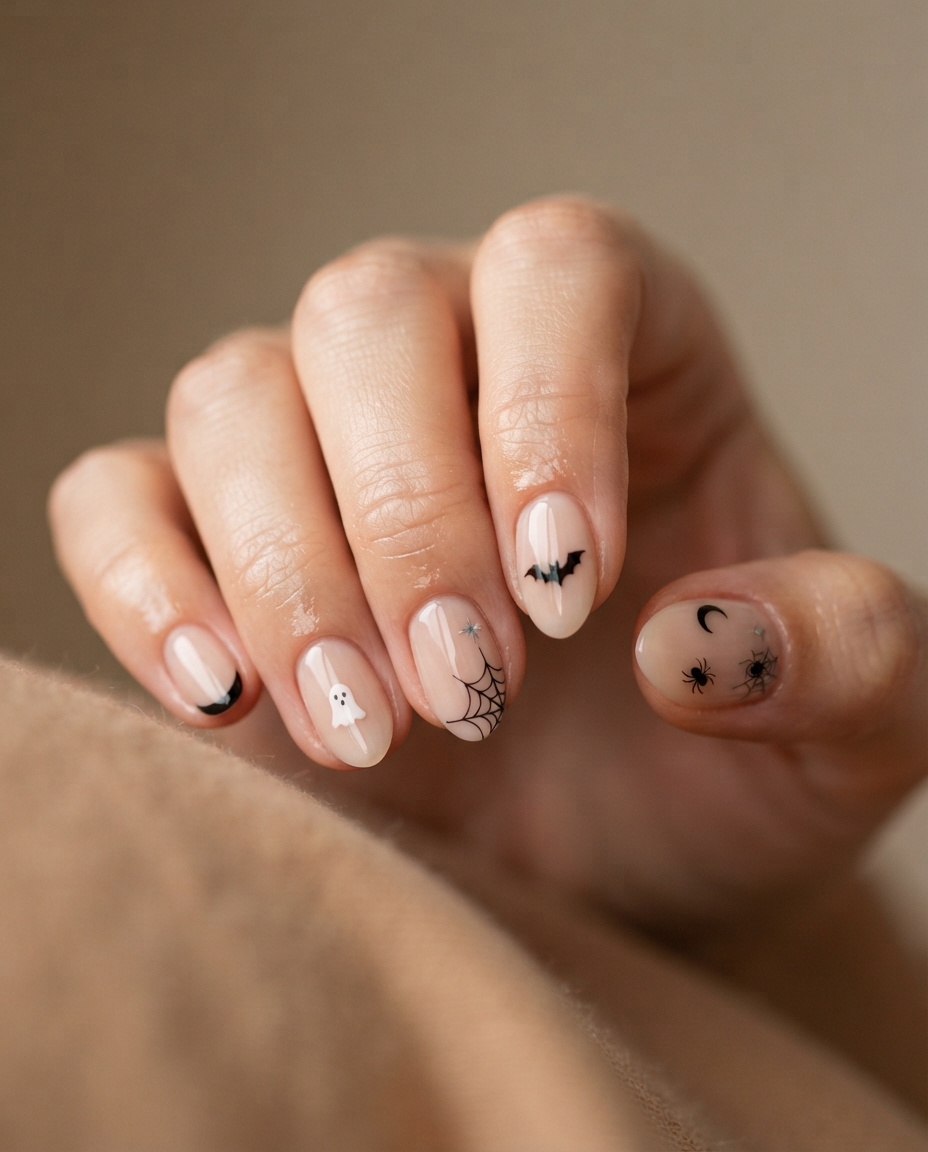
Start with a sheer nude base across all ten nails. Then use tiny black-and-white details such as a miniature ghost, a crescent moon, one small bat, a fine spiderweb corner, and perhaps one micro French tip. Because the artwork remains small and the colors stay consistent, the manicure feels coordinated even though each nail is different.
This is one of the most effective designs to bring to a nail technician because it can be customized easily. You can choose the symbols you actually like and remove anything that feels too cute, too dark, or too detailed.
Best for: Anyone who wants Halloween nails unmistakably while still maintaining a clean overall manicure.
How to Choose a Halloween Nail Design You Will Actually Want to Wear
The easiest mistake to make with seasonal nail art is choosing a manicure based entirely on how exciting it looks in a photograph. A highly detailed set can be beautiful on Pinterest but feel surprisingly difficult to wear for two or three weeks if it does not match your normal style. Before choosing a design, consider what you usually enjoy looking at on your own hands.
If most of your regular manicures are nude, pale pink, or French, you probably do not need to switch suddenly to ten heavily illustrated Halloween nails just because it is October. A milky base with tiny ghosts, black micro French tips, bats, or one spider accent will still feel seasonal while remaining familiar.
If you already love dark polish, Halloween is an opportunity to experiment with finish rather than completely change your aesthetic. Black chrome, magnetic cat-eye polish, matte and glossy combinations, deep plum, or smoky gradients can create a strong seasonal mood without including any literal Halloween imagery.
Your lifestyle matters as well. Extremely detailed designs may show wear more noticeably if you work frequently with your hands, while dark solid colors, French tips, and small accents tend to remain visually coherent even after a little growth.
The best choice is usually the manicure that feels like your normal taste turned slightly more October.
How to Make Halloween Nails Look Classy Instead of Costume-Like
There is nothing wrong with playful Halloween nails, but if your goal is a more polished result, restraint becomes especially important. Halloween already comes with a strong visual vocabulary — orange, black, ghosts, pumpkins, bats, webs, skulls, blood, flames, moons — and combining too many of those elements in one manicure can make each individual detail compete for attention.
A limited palette is one of the easiest ways to create cohesion. Black and nude, burgundy and blush, orange and cream, or navy and silver are all strong combinations because every nail feels connected even when the artwork changes.
Scale matters just as much. A tiny ghost on a sheer nail reads very differently from a large ghost covering the entire nail plate. A spiderweb placed in one corner appears more delicate than a web spanning every finger. Small artwork preserves negative space, and negative space gives the manicure a cleaner overall composition.
Finish can also carry much of the theme. Matte black with glossy detailing, smoky magnetic polish, pearl effects, chrome, or a burgundy gradient can feel dramatic enough that additional illustrations are unnecessary.
The goal is not to make the manicure less Halloween. It is to decide which one or two elements should do the visual work and allow everything else to support them.
Short Halloween Nails Can Look Just as Detailed
Long nail extensions provide more room for elaborate art, but short nails can actually make Halloween designs look especially neat because every element has to be simplified. Instead of trying to fit a detailed illustration onto a small surface, choose designs that naturally work at a reduced scale.
Micro French tips, miniature ghosts, tiny bats, single spiders, checkerboard accents, solid burgundy, tortoiseshell, and black chrome all translate well to shorter nails. Short squoval and oval shapes are particularly useful because they provide a broad enough surface for tiny artwork while remaining practical.
Placement matters more when space is limited. A miniature design near one edge generally looks more intentional than trying to center a complicated image in the middle of a short nail. Leaving visible space around the artwork keeps the nail from appearing crowded.
Color can also do more work than illustration. A rich wine manicure with one tiny black accent may feel more striking on short nails than a complicated scene squeezed into the same area.
How to Explain the Design to Your Nail Tech
Saving a reference image is useful, but the best salon results usually come from identifying what you actually like about the image rather than simply asking for an exact copy.
For example, you might love the nude base and tiny scale of a ghost manicure but prefer round nails instead of almond. You might like a blood-drip design but want burgundy instead of bright red. You may want the spiderweb placement from one photograph combined with the matte finish from another.
Point those elements out individually.
It also helps to mention which parts are most important to you. If the precise French tip thickness matters more than the nail length, say so. If you want the Halloween details to be extremely small, make that clear before the artwork begins. If you want a translucent rather than opaque nude base, show the technician the level of transparency you have in mind.
The goal of a reference photograph should be to communicate the design language, not necessarily to reproduce someone else’s manicure nail for nail.
Choosing the Right Halloween Nail Colors
Black and orange may be the traditional Halloween pairing, but they are far from the only colors capable of creating a seasonal manicure. In fact, expanding the palette often produces a result that is easier to wear with everyday outfits.
Deep burgundy creates the drama of red while feeling richer and more autumnal. Plum offers a slightly romantic alternative to black. Espresso and chocolate brown create darkness while remaining neutral. Midnight blue works beautifully with stars and moons, while smoky grey can create an eerie effect without becoming overwhelmingly dark.
For lighter manicures, milky nude, sheer blush, ivory, beige, and translucent taupe provide clean backgrounds for black or white artwork. Burnt orange and terracotta create a softer pumpkin-inspired palette than neon orange, while muted mustard can be used sparingly for vintage Halloween color combinations.
Metallic accents can change the entire mood as well. Silver tends to make celestial and dark designs feel cooler and more mysterious, while gold introduces warmth and pairs particularly well with burgundy, plum, brown, and burnt orange.
Rather than starting with the question “What colors are Halloween colors?” it is often more useful to ask which normal colors you enjoy wearing and how they can be pushed slightly darker, warmer, or more dramatic for October.
How to Keep Detailed Halloween Nail Art Looking Fresh
Detailed nail art depends on a clean surface, so protecting the top coat becomes particularly important. Once the finish begins to scratch or dull, tiny illustrations can lose some of their clarity even if the polish itself has not chipped.
Cuticle oil helps the surrounding skin remain hydrated, which makes the manicure look better as it grows out. Apply a small amount around each nail and massage it into the nail folds rather than flooding the entire fingertip.
When wearing traditional polish, adding a thin layer of compatible clear top coat after several days can restore shine. Gel manicures do not usually need the same refresh, but harsh scraping, cleaning chemicals, and using the nails as tools can still damage the surface.
If a tiny edge begins lifting, resist picking at it. Pulling the product can remove material from the natural nail and turn one small area of wear into a much larger problem.
Seasonal nail art should survive long enough for you to enjoy it. A little maintenance is considerably easier than losing your favorite ghost or spiderweb several days before Halloween.
FINAL THOUGHTS
The best Halloween nails are not necessarily the ones with the most ghosts, the longest extensions, or the most complicated hand-painted artwork. They are the ones that make the season recognizable while still feeling like something you genuinely want on your hands.
For some people, that will mean tiny ghosts floating over milky nude polish. For others, it will be glossy black almond nails, a smoky cat-eye effect, tortoiseshell, deep burgundy, or one almost invisible spider sitting near the edge of a natural-looking nail.
Halloween permits you to make a manicure slightly darker, stranger, cuter, or more dramatic than usual, but you do not have to abandon your normal aesthetic to participate.
Use these twenty-five ideas as references rather than rigid templates. Change the nail length. Replace black with burgundy. Make the ghost smaller. Remove an accent nail. Add more negative space. Combine the moon from one design with the French tip from another.
Then take the version you actually love to your nail tech.
Because the Halloween manicure worth saving is not simply the one that looks good on a screen. It is the one you are still happy to see every time you look down at your hands.